Sunday, February 28, 2021

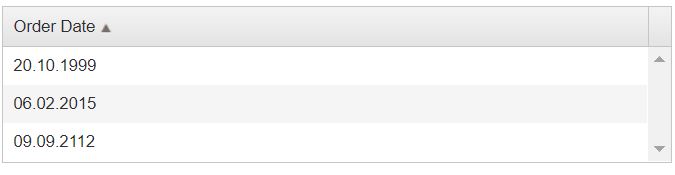
Date sorting in Kendo UI Grid for dd.MM.yyyy format

Date sorting not working as expected in Kedno grid when format does not follow the order YEAR -> MONTH -> DAY.

It is because dates are treated as strings objects and they are compared as plain text.

One solution is to parse strings to dates and sorting will work in an expected manner.

KendoGridSortedDate.js

 1
 2
 3
 4
 5
 6
 7
 8
 9
10
11
12
13
14
15
16
17
18
19
20
21
22
23
24
25
26
27
28
29
30
31
32
var orders = [        
    { OrderDate: '10 20 1999' }, 
    { OrderDate: '2/06/2015' }, 
    { OrderDate: '09/09/2112'}
];

$("#singleSort").kendoGrid({
    dataSource: {
        schema: {
            model: {
                fields: {
                    OrderDate: {
                        type: "date",
                        parse: function (e) {
                            return new Date(e)
                        }
                    }
                }
            }
        },
        data: orders
    },
    sortable: true,

    columns: [
        {
            field: "OrderDate",
            title: "Order Date",
            format: "{0:dd.MM.yyyy}"
        }
    ]
});

KendoGridSortedDate.html

 1
 2
 3
 4
 5
 6
 7
 8
 9
10
11
12
13
14
15
16
17
18
19
20
21
22
23
24
25
26
<!DOCTYPE html>
<html>
  <head>
   
    <style>html { font-size: 12px; font-family: Arial, Helvetica, sans-serif; }</style>
    <title></title>
   
    <link rel="stylesheet" href="http://cdn.kendostatic.com/2015.1.318/styles/kendo.common.min.css" />
    <link rel="stylesheet" href="http://cdn.kendostatic.com/2015.1.318/styles/kendo.default.min.css" />
    <link rel="stylesheet" href="http://cdn.kendostatic.com/2015.1.318/styles/kendo.dataviz.min.css" />
    <link rel="stylesheet" href="http://cdn.kendostatic.com/2015.1.318/styles/kendo.dataviz.default.min.css" />

    <script src="http://cdn.kendostatic.com/2015.1.318/js/jquery.min.js"></script>
    <script src="http://cdn.kendostatic.com/2015.1.318/js/angular.min.js"></script>
    <script src="http://cdn.kendostatic.com/2015.1.318/js/kendo.all.min.js"></script>

  </head>
  <body>
    <div class="demo-section k-header">
      <div id="singleSort"></div>
    </div>

    <script src="KendoGridSortedDate.js"></script>

  </body>
</html>

Source links:

Sorted grid


Saturday, February 27, 2021

Convert a string to a date with javascript method

Change string to date is a frequent action.

Below you can find javascript method which return Date from string.

Function name is stringToDate.

Input parameters are:

  • _date parameter with date in string format
  • _format parameter - use yyyy, dd and MM. Example : yyyy.MM.dd
  • _delimiter - delimiter, for example ".". Can be omitted

 1
 2
 3
 4
 5
 6
 7
 8
 9
10
11
12
13
14
15
16
17
18
19
20
21
22
23
24
25
26
27
28
29
30
31
32
33
34
35
36
<script>

console.log(stringToDate("01/9/2020","dd/MM/yyyy","/")); // Tue Sep 01 2020 00:00:00 GMT+0200 (Central European Summer Time)
console.log(stringToDate("9 2020","MM yyyy"," ")); // Tue Sep 01 2020 00:00:00 GMT+0200 (Central European Summer Time)
console.log(stringToDate("9/17/2020","mm/dd/yyyy","/")); // Thu Sep 17 2020 00:00:00 GMT+0200 (Central European Summer Time)
console.log(stringToDate("9-17-2020","mm-dd-yyyy","-")); // Thu Sep 17 2020 00:00:00 GMT+0200 (Central European Summer Time)
console.log(stringToDate("09/2/2020","mm/dd/yyyy","/")); // Wed Sep 02 2020 00:00:00 GMT+0200 (Central European Summer Time)
console.log(stringToDate("01/9/2020","dd/MM/yyyy")); // Tue Sep 01 2020 00:00:00 GMT+0200 (Central European Summer Time)
console.log(stringToDate("9 2020","MM yyyy")); // Tue Sep 01 2020 00:00:00 GMT+0200 (Central European Summer Time)
console.log(stringToDate("9/17/2020","mm/dd/yyyy")); // Thu Sep 17 2020 00:00:00 GMT+0200 (Central European Summer Time)
console.log(stringToDate("9-17-2020","mm-dd-yyyy")); // Thu Sep 17 2020 00:00:00 GMT+0200 (Central European Summer Time)
console.log(stringToDate("09/2/2020","mm/dd/yyyy")); // Wed Sep 02 2020 00:00:00 GMT+0200 (Central European Summer Time

function stringToDate(_date,_format,_delimiter)
{
            if (!_delimiter)
                _delimiter = _format.match(/\W/g)[0];

            var formatLowerCase=_format.toLowerCase();
            var formatItems=formatLowerCase.split(_delimiter);
            var dateItems=_date.split(_delimiter);
            var monthIndex=formatItems.indexOf("mm");
            var dayIndex=formatItems.indexOf("dd");
            var yearIndex=formatItems.indexOf("yyyy");
            var month=parseInt(dateItems[monthIndex]);
            month-=1;

            var day = 1;
            if (dayIndex >= 0)
                day = dateItems[dayIndex];

            var formatedDate = new Date(dateItems[yearIndex], month, day);
            return formatedDate;
}

</script>

Monday, February 22, 2021

SQL How to group identifiers that are related with each other in specific groups

This article is a guide for grouping mutually related identifiers in groups using SQL. In math terminology, we could say it will find all connected subgraphs of an undirected graph (Graph Theory - Connectivity).

A graph is said to be connected if there is a path between every pair of a vertex.

Input, connected ident pairs:

Ident1 | Ident2 
---------------------------------
 1     | 2         
 1     | 3         
 4     | 5         
 4     | 6        

So, in the example above 1, 2 and 3 are in a group (subgraph) 1.

4, 5 and 6 are in group 2.

Note that 1, 2 and 3 are in the same group although 2 and 3 are not directly related.

Output, idents with related groups:

Ident  | Group
---------------------------------
 1     | 1         
 2     | 1         
 3     | 1         
 4     | 2 
 5     | 2
 6     | 2

So, how to make connectivity groups of related elements in SQL?

My suggestion which is relatively easy to achieve is to use sp_GetIdentByGroup stored procedure. This stored procedure expects temporary table #PairIds to be created and filled. #PairIds have connected pairs ids. Result set returns Ident columns with Ids from #PairIds which are assigned to a specific group of connected elements.

First stored procedure sp_GetIdentByGroup should be created and after that sp_GetIdentByGroup can be executed to get a result.

 1
 2
 3
 4
 5
 6
 7
 8
 9
10
11
12
13
CREATE TABLE #PairIds
(
	Ident1 INT,
	Ident2 INT
)

INSERT INTO #PairIds
VALUES (1, 2),
(1, 3),
(4, 5),
(4, 6)

exec [dbo].[sp_GetIdentByGroup]

This stored procedure use cursor for grouping together related elements. The index makes it relatively fast. It is SQL 2012+ compatible.

Script for create [dbo].[sp_GetIdentByGroup] procedure:

  1
  2
  3
  4
  5
  6
  7
  8
  9
 10
 11
 12
 13
 14
 15
 16
 17
 18
 19
 20
 21
 22
 23
 24
 25
 26
 27
 28
 29
 30
 31
 32
 33
 34
 35
 36
 37
 38
 39
 40
 41
 42
 43
 44
 45
 46
 47
 48
 49
 50
 51
 52
 53
 54
 55
 56
 57
 58
 59
 60
 61
 62
 63
 64
 65
 66
 67
 68
 69
 70
 71
 72
 73
 74
 75
 76
 77
 78
 79
 80
 81
 82
 83
 84
 85
 86
 87
 88
 89
 90
 91
 92
 93
 94
 95
 96
 97
 98
 99
100
101
102
103
104
105
106
107
108
109
110
111
112
113
114
115
116
117
118
119
120
121
122
123
124
125
126
127
128
129
130
131
132
133
134
135
136
137
CREATE PROCEDURE [dbo].[sp_GetIdentByGroup]
AS
BEGIN

	DECLARE @message VARCHAR(70);
	DECLARE @IdentInput1 varchar(20)
	DECLARE @IdentInput2 varchar(20)
	DECLARE @Counter INT
	DECLARE @Group1 INT
	DECLARE @Group2 INT
	DECLARE @Ident varchar(20)
	DECLARE @IdentCheck1 varchar(20)
	DECLARE @IdentCheck2 varchar(20)

	SET @Counter = 1

	DECLARE @IdentByGroupCursor TABLE (
	Ident varchar(20) UNIQUE CLUSTERED,
	GroupID INT  
	);

	-- Use a cursor to select your data, which enables SQL Server to extract
	-- the data from your local table to the variables.
	declare ins_cursor cursor for
	select  Ident1, Ident2 from #PairIds


	open ins_cursor
	fetch next from ins_cursor into @IdentInput1, @IdentInput2 -- At this point, the data from the first row
	 -- is in your local variables.

	-- Move through the table with the @@FETCH_STATUS=0
	WHILE @@FETCH_STATUS=0
	BEGIN

		SET @Group1 = null
		SET @Group2 = null

		SELECT TOP 1  @Group1 = GroupID,  @IdentCheck1 = Ident
		FROM @IdentByGroupCursor
		WHERE Ident in (@IdentInput1)

		SELECT TOP 1  @Group2 = GroupID,  @IdentCheck2 = Ident
		FROM @IdentByGroupCursor
		WHERE Ident in (@IdentInput2)

		IF (@Group1 IS NOT NULL AND @Group2 IS NOT NULL)
		BEGIN
			IF @Group1 > @Group2
			BEGIN
				UPDATE @IdentByGroupCursor
				SET GroupID = @Group2
				WHERE
				GroupID = @Group1
			END

			IF @Group2 > @Group1
			BEGIN
				UPDATE @IdentByGroupCursor
				SET GroupID = @Group1
				WHERE
				GroupID = @Group2
			END
		END
		ELSE IF @Group1 IS NOT NULL
		BEGIN
			UPDATE @IdentByGroupCursor
			SET GroupID = @Group1
			WHERE
			Ident IN (@IdentInput1)
		END
		ELSE IF @Group2 IS NOT NULL
		BEGIN
			UPDATE @IdentByGroupCursor
			SET GroupID = @Group2
			WHERE
			Ident IN (@IdentInput2)
		END

		IF (@Group1 IS NOT NULL AND @Group2 IS NOT NULL)
		BEGIN
			IF @Group1 > @Group2
			BEGIN
				UPDATE @IdentByGroupCursor
				SET GroupID = @Group2
				WHERE
				GroupID = @Group1
			END

			IF @Group2 > @Group1
			BEGIN
				UPDATE @IdentByGroupCursor
				SET GroupID = @Group1
				WHERE
				GroupID = @Group2
			END

		END

			IF @Group1 IS NULL
			BEGIN

				INSERT INTO @IdentByGroupCursor (Ident, GroupID)
				VALUES (@IdentInput1, ISNULL(@Group2, @Counter))

			END

			IF @Group2 IS NULL
			BEGIN
				INSERT INTO @IdentByGroupCursor (Ident, GroupID)
				VALUES (@IdentInput2, ISNULL(@Group1, @COunter))
			END

			IF (@Group1 IS NULL OR @Group2 IS NULL)
			BEGIN

			SET @COunter =  @COunter  +1

		END

		-- Once the execution has taken place, you fetch the next row of data from your local table.
		fetch next from ins_cursor into @IdentInput1, @IdentInput2

	End


	-- When all the rows have inserted you must close and deallocate the cursor.
	-- Failure to do this will not let you re-use the cursor.    
	close ins_cursor
	deallocate ins_cursor


	SELECT Ident ,DENSE_RANK() OVER( ORDER BY GroupID ASC) AS GroupID
	FROM @IdentByGroupCursor

END
GO

Sunday, February 21, 2021

How to add code snippet in blogger

After a a while I wanted to write new blog post with snippet of SQL code. After googled "add code snippet to blogger" search terms at the of the results a link to the hilite web was found.

It is a very easy to use web. I recommend.

It can be used for various programming languages.

The user only needs to:

  • Type source code
  • Choose Language, Style and Line numbers
  • Click the Higlight button, Preview will appear the and the user only needs to copy and paste HTML code from HTML textbox into blogger post (in HTML view)

Thursday, May 22, 2014

.NET project on online Source control

Visual Studio 2013 express have a option to add your project to Source Control. It is easy to add project to local repository location. In this article you will find step by step tutorial how to add your project to free private Source control located on the internet.

Bitbucket supports private or public Git/Mercurial repositories up to 5 users.

Why you need online Source control Repository?

Let's say you developing your project and one day your computer crash down. It is pity to lose all your development effort till this point. So if you have local Source Control repository you will lost everything. But if you have online repository you could continue to work from your last check in on other computer.

Of course, there are other reasons why you should use online Source safe like sharing work and code with other people who are distant from you but in my case online backup is main reason to use online source control.

Step by step guide for online Source Control with Visual Studio 2013 express
  • To add your project to Source control click FILE --> Add to Source Control


  • Choose Git radio button and click OK

  • If you get error like this: "The current solution has projects that are located outside the solution folder. These projects will not be source controlled in the Git repository..." check Add ASP .NET Empty Web Site to Git Source control

  • Open Team Explorer, VIEW --> Team Explorer

  • Choose Changes in dropdown of Team Explorer window


  • Commit to local GIT, enter the comment (eg. "Initial Commit") and choose Commit from dropdown


  • Click on "Unsynced Commits"


  • Now you need to enter URL of an empty GIT repo, to get this URL you need to create account on Bitbucket

    • Creating Bitbucket repository

    • Go to Bitbucket and Sign up for free

    • Click on button Create to create new Bitbucket repository


    • enter Name, Description, Access level (in this sample I checked private repostiroy checkbox), Repository type (Git) and Language (C#)

    • after Create repository button is clicked you create new repository

    • next step is to copy URL,
      URL is in format :
      https://bitbucket.org/[ProfileName]/[RepoName]
      So if my profile on bitbucket is Me URL will be:
      https://bitbucket.org/Me/newwebsite

    • let's go back on Visual Studio 2013

  • In Visaul Studio in Team Explorer paste link of your BitBucket Repository and click Pubish


  • Enter you BitBucket username and password if you are asked. If everything is ok you will see meassage : "The origin remote has been added and the current branch has been published."

  • If you click Sync button your code will be synced on online BitBucket location

  • You can check it by going on BitBucket web page, choose repository and clicking Source under Navigation tab.

Monday, May 19, 2014

Add ASP .NET Empty Web Site to Git Source control

Visual Studio 2013 have feature to add your .NET projects to Git source control. But when you try to add your ASP NET Empty Web Site solution to Git Source control it failed. The message is:
The current solution has projects that are located outside the solution folder. These projects will not be source controlled in the Git repository. To add all the projects to a single Git repository please consolidate all projects under a singe folder.

Here are step by step instruction how to create new ASP NET Empty Web Site which can be added to GIT source control.

  • First open New Web Site in Visual Studio


  • the second step is to choose ASP .NET Empty Web Site,I choose NewWebSite for name of a site, after button OK is clicked site will be created in
    C:\Users\Name\Documents\Visual Studio 2013\WebSites\NewWebSite
    folder.
    Inside path instead of Name will be User name on your computer


  • Solution is created. If you click on Solution NewWebSite and look in the properties prpoerty Path you will see solution file is located inside:
    C:\Users\Name\Documents\Visual Studio 2013\Projects\NewWebSite\
    It is not good if you want to add your web site to source control

  • Click on the solution file, click menu FILE --> Save NewWebSite.sln As ...
    Now save your solution file inside WebSite folder:
    C:\Users\Name\Documents\Visual Studio 2013\WebSites\NewWebSite
    Your .sln file should be in same folder as WebSite project

  • maybee it is good idea to delete folder:
    C:\Users\Name\Documents\Visual Studio 2013\Projects\NewWebSite\
    to make things simpler

  • Now you can click FILE --> Add to Source Control


  • Choose Git radio button and click OK.

  • So, you successfully created Local Git Repository for your ASP .NET Empty WebSite

Tuesday, May 13, 2014

ASP.NET authentication with Facebook, LinkedIn and Google

How to make possible to authenticate with some of social network ID (such as Google authentication, facebook login and LinkedIn) to your ASP.NET web form application?


Use Visual Studio 2013 built in functionality

One possibility is to use Visual Studio 2013 built in functionality inside ASP .NET Web Form Site template (it is not only template with built in authentication). You need to configure project to work with social networks logins.

To learn more how to configure Visual Studio 2013 to work with external social sites visit: External authentication services c# and Logging In Using External Sites in an ASP.NET Web Pages.


    Why I do not like VS built in authentication inside templates

  • I find it difficult to understand and change to my application needs

  • do not know what happens under the hood, for example in ASP .NET Web Form Site template, attached database is created with tables for storing data about users, I do not know when this database is created and do not know how methods exactly work

  • connecting to external social networks is relatively new and have bugs

  • so if you want to use proposed model go with it, but if you have some specific ideas maybe it is good idea to start from scratch

How Asp.NET logging communicate with Facebook

This is simplified and User agent is not taken into account
  • ASP.NET site sends facebook Application ID and URL of ASP.NET application to facebook
    (https://graph.facebook.com/oauth/authorize?client_id=[ApplicationID]&redirect_uri=[ASP.NET_ADDRESS])

  • user is redirected to facebook site where he need to login with his facebook login

  • facebook authorization page is redirected to ASP.NET authorization page, inside URL is "code" query parameter

  • ASP.NET read code parameter and send web request to facebook with ApplicationID, Application secret and code which is received two steps before

  • ASP.NET get response from facebook site, now ASP.NET have a token

  • Now ASP.NET can send request to facebook site with token to get data about user


There is a code for authentication to your ASP.NET application with Facebook login.

  • Facebook button is first clicked

  • when facebook page redirect back to ASP.NET page GetAuthToken method is called and then GetUserInfo method is called

  • inside GetUserInfo method ASP.NET get id of facebook user and user facebook name

  • you must create facebook application to get APP_KEY and APP_SECRET, find more about it here

Code:
using System;
using System.Collections.Generic;
using System.Linq;
using System.Web;
using System.Web.UI;
using System.Web.UI.WebControls;
using System.Text;
using System.IO;
using Newtonsoft.Json.Linq;
using System.Net;

public partial class JustFacebook : System.Web.UI.Page
{
    protected void Page_Load(object sender, EventArgs e)
    {       
        if (Request.Url.AbsolutePath.IndexOf("/OnFacebookAuth") > 0 && !string.IsNullOrEmpty(Request.Params["code"]))
        {          
            GetAuthToken();
            GetUserInfoAction();
        }

    }

    protected void btnFacebookLogin_Click(object sender, EventArgs e)
    {
        string redirectTo = Request.Url.Scheme + "://" + Request.Url.Authority + Request.Url.AbsolutePath + "/OnFacebookAuth";
        string request = string.Format("https://graph.facebook.com/oauth/authorize?client_id={0}&redirect_uri={1}", "APP_KEY", redirectTo);
        Response.Redirect(request);
    }

    private void GetAuthToken()
    {
        string redirectTo = Request.Url.Scheme + "://" + Request.Url.Authority + Request.Url.AbsolutePath;
        string code = Request.Params["code"];
        string facebookApplicationSecret = "APP_SECRET";
        string request = string.Format("https://graph.facebook.com/oauth/access_token?client_id={0}&redirect_uri={1}&client_secret={2}&code={3}", APP_KEY, redirectTo,facebookApplicationSecret, code);

        var httpRequest = (HttpWebRequest)WebRequest.Create(request);
        var httpResponse = (HttpWebResponse)httpRequest.GetResponse();

        Encoding enc = Encoding.UTF8;
        var loResponseStream = new StreamReader(httpResponse.GetResponseStream(), enc);
        string response = loResponseStream.ReadToEnd();
        try
        {
            string[] pairResponse = response.Split('&');
            string accessToken = pairResponse[0].Split('=')[1];
            Session["FacebookAccessTokenSession"] = accessToken;
        }
        catch
        {
            throw;
        }
    }

    private void GetUserInfoAction()
    {
        if (Session["FacebookAccessTokenSession"] != null)
        {
            object token = Session["FacebookAccessTokenSession"];
            string request = string.Format("https://graph.facebook.com/me?access_token={0}", token);
            var httpRequest = (HttpWebRequest)WebRequest.Create(request);
            var httpResponse = (HttpWebResponse)httpRequest.GetResponse();

            Encoding enc = Encoding.UTF8;
            var loResponseStream = new StreamReader(httpResponse.GetResponseStream(), enc);

            string response = loResponseStream.ReadToEnd();
            JObject jsonObject = JObject.Parse(response);

            var id = (string)jsonObject["link"];
            var displayName = (string)jsonObject["name"];
        }
    }
}


Simplest way to authenticate using external social network logins

Some good people make various classes to make easier to login using Facebook, Google authenticate, LinkedIn and others. Those classes hides complexity of communicating with LogIn services.

I find ASPSnippets very handy and easy for use. There is simple step by step tutorial for:


Code:
using System;
using System.Collections.Generic;
using System.Linq;
using System.Web;
using System.Web.UI;
using System.Web.UI.WebControls;
using ASPSnippets.LinkedInAPI;
using ASPSnippets.FaceBookAPI;
using System.Web.Script.Serialization;
using System.Data;

public partial class JustASPSnippets : System.Web.UI.Page
{
    protected void Page_Load(object sender, EventArgs e)
    {
        FaceBookConnect.API_Key = FACEBOOK_KEY;
        FaceBookConnect.API_Secret = FACEBOOK_SECRET;
        if (!string.IsNullOrEmpty(Request.Params["code"]) && Session["SocialNetworkCalled"] == "Facebook")
        {
            string code = Request.QueryString["code"];
            string data = FaceBookConnect.Fetch(code, "me");
            FaceBookUser faceBookUser = new JavaScriptSerializer().Deserialize<FaceBookUser>(data);

            string id = faceBookUser.Id;
            string userName = faceBookUser.UserName;
            string name = faceBookUser.Name;
            string email = faceBookUser.Email;
        }

        LinkedInConnect.APIKey = LINKEDIN_KEY;
        LinkedInConnect.APISecret = LINKEDIN_SECRET;
        LinkedInConnect.RedirectUrl = Request.Url.AbsoluteUri.Split('?')[0];
        if (LinkedInConnect.IsAuthorized && Session["SocialNetworkCalled"] == "LinkedIn")
        {
            DataSet ds = LinkedInConnect.Fetch();
            string a = ds.Tables["person"].Rows[0]["first-name"].ToString();
            string b = a + " " + ds.Tables["person"].Rows[0]["last-name"].ToString();
            string email = ds.Tables["person"].Rows[0]["email-address"].ToString();
            string linkeinemail = ds.Tables["person"].Rows[0]["id"].ToString();
        }
        
        Session["SocialNetworkCalled"] = "";

    }

    protected void btn_FacebookLogin_Click(object sender, EventArgs e)
    {
        Session["SocialNetworkCalled"] = "Facebook";
        FaceBookConnect.Authorize("email,user_birthday", Request.Url.AbsoluteUri.Split('?')[0]);
    }

    protected void btn_LinkedInLogin_Click(object sender, EventArgs e)
    {
        Session["SocialNetworkCalled"] = "LinkedIn";
        LinkedInConnect.Authorize();    
    }
}

FaceBookUser class:

Code:
using System;
using System.Collections.Generic;
using System.Linq;
using System.Web;

/// <summary>
/// Summary description for Facebook
/// </summary>
public class FaceBookUser
{
    public string Id { get; set; }
    public string Name { get; set; }
    public string UserName { get; set; }
    public string PictureUrl { get; set; }
    public string Email { get; set; }
    public string Birthday { get; set; }
    public string Gender { get; set; }
    public FaceBookEntity Location { get; set; }
}

public class FaceBookEntity
{
    public string Id { get; set; }
    public string Name { get; set; }
}

Let's try explain code in few lines:


  • when btn_FacebookLogin is clicked, FaceBookConnect.Authorize method is called, it redirect user to facebook login page

  • if user successfully login to facebook, he is redirected back to ASP.NET application Login page

  • then inside Page_Load it is recognized ASP.NET page is loaded after facebook login page

  • FaceBookConnect.Fetch method is called and ASP.NET application can get data about user

  • with LinkedIn authentication is similar process

A few more things

Be careful with Google OpenId identifier because it change if you change domain.


Thursday, August 8, 2013

Open localhost web aplication on iphone from your local IIS

Find how to open and test your ASP.NET application located on your Win 7.0 from your iPhone.


  • 1. turn on WLAN on your PC

  • 2. place your ASP.NET application on your IIS 7.0
    For example I deployed simple WebTest ASP.NET application to my IIS 7.0. Try click "Browse *:80 (http)" from IIS to be sure your application properly running


  • 3. find your computer IPv4 Address
    - open Command Prompt (All Programs --> Accessories --> Command Prompt)
    - type ipconfig
    - remember IPv4Address (in format 192.x.x.x)

  • 4. try to open your ASP.NET application from your PC
    - instead of localhost type IPv4Address, in my case it is "http://192.x.x.x/WebTest/"
    - if it works proceed to next step

  • 5. connect your iPhone to your WLAN
    - on your iPhone: Settings --> Wi-Fi
    - Wi-Fi should be "ON" and you need to choose your WLAN Network


  • 6. try to type address in your browser on your iphone (in my example something like this "http://192.x.x.x/WebTest/")

  • 7. if "http://192.x.x.x" open IIS page on your iphone but "http://192.x.x.x/WebTest/" (of course WebTest is in only in my example) does not open web application try open Control Panel --> Window Firewall --> Allow a Program through Windows Firewall
    - in "Allowed programs" click "Change setting" button and check "World Wide Web Services (HTTP)" and "Home/Work (Private)"
    - after this change you should see your web applicatio in your iPhone browser

Wednesday, March 27, 2013

HTML5 canvas

Canvas is perhaps one of those features of HTML5 which caused a great deal of stir among the web developers. In simple sense, canvas tag allows you to specify a region on your document where you can draw stuff. One thing to be noted is we have to use some sort of a scripting language (usually JavaScript) to interact with canvas. For today's article I'll assume you know the basics of JavaScript.


Creating a Canvas Element

Creating a canvas element is quite simple:


<canvas height = "200" width = "200" id = "canvas1" ></canvas>
It is advised to always give a height and width to canvas element. A id is also necessary as there can be more than one canvas element in a single page.

The above code is actually as far as only HTML will take us, for functionalities of canvas we gotta use JavaScript as mentioned earlier. Please bear in mind any subsequent codes seen in this article must be written inside script tag or an external script file.

Understanding the Context

When we draw something on canvas, we actually retrieve the "context" of the canvas and put stuff on it. Broadly speaking, there are two types of context, 2d (mostly used) and 3d (still experimental). We will use the 2d context. Our first job is to identify our canvas element and create a handler to its 2d context. We do this by the following fragment:


 var canvas = document.getElementById('canvas1');
 var ctx = canvas.getContext('2d');
 
We are first creating a handler to our canvas element (recall it had the id 'canvas1'), then we are retrieving its 2d context through the function getContext().

Basic Canvas Properties

Remember we grabbed the context just on the previous section? Now we are going to set some of its properties. First let's have a look at three basic properties:

  • fillStyle:
    style to use when filling. We can specify CSS colors,gradients or patterns (defaults to black).

  • strokeStyle:
    style to use when filling. Constraints similar to that of fillStyle.

  • lineWidth:
    width of the lines drawn by our imaginary pen on canvas.

Drawing with colors and styles is a two step process. First one is to set the above properties. Other one is to perform the drawing operation i.e. calling the function which performs drawing.

Fill and Stroke

While dealing with canvas you'll find two versions of a function to create rectangles. these are fillRect and strokeRect ("Rect" standing for rectangle). What fill does is it creates the solid shape filled with the designated color/pattern, whereas stroke simply outlines the shape with that color. An example is presented shortly.

Before we append the following fragment to our code, let's have a look at the arguments that the fillRect or strokeRect takes:
x-coord, y-coord, width, height
The coordinates specify the position of upper-left corner of the rectangle, and width and height denotes the size of the rectangle. One reminder, the origin of the coordinate system is situated at the top-left corner of the canvas. Now we can append the following segment:


 ctx.fillStyle = 'tan';
 ctx.fillRect(10, 10, 100, 100);
  
 ctx.lineWidth = 5;
 ctx.strokeStyle = 'red';
 ctx.strokeRect(10 , 10, 100, 100);
 

First we chose the color tan and created a solid rectangle at (10, 10) having height and width of 100. Then we selected the lineWidth to be 5. Next we again selected a color, this time red; and stroked a rectangle at (10, 10) having similar dimensions as the previous rectangle. Notice although we have used colors as the property of fillStyle and such, we could have also used gradients or patterns, which is quite easily possible using CSS3.

Sample:
Your browser does not support the HTML5 canvas tag.

Sample code:
<canvas id="CanvasFill" width="120" height="120">
Your browser does not support the HTML5 canvas tag.
</canvas>

<script>
    var canvas = document.getElementById('CanvasFill');
    var ctx = canvas.getContext('2d');
    
    ctx.fillStyle = 'tan';
    ctx.fillRect(10, 10, 100, 100);

    ctx.lineWidth = 5;
    ctx.strokeStyle = 'red';
    ctx.strokeRect(10, 10, 100, 100);
    
</script>


Drawing Lines

For drawing a line we are going to use four functions: beginPath, moveTo, lineTo and stroke. The function beginPath tells that we are going to create path. We move the imaginary pen to a location through lineTo function. Notice that by "moving the pen" I mean picking the tip of the pen up and then placing it down again at the designated coordinate. The function lineTo instructs to draw a line starting from the current point to th point passed as parameter of lineTo. But the line is actually not drawn unless we call the stroke function. Let's have a look at the following fragment of code:


  ctx.lineWidth = 1;
  ctx.strokeStyle = 'black';
  ctx.beginPath();
  ctx.moveTo(10, 10);
  ctx.lineTo(110, 110);
  ctx.stroke();
  ctx.lineTo(200, 110);
  ctx.stroke();
 

We are setting the line width to be 1 and the color of the stroke to be black. Then we call the beginPath function. We move our imaginary pen to a point, in this case the point (10, 10). In the next line we instruct to create a line from (10, 10) to (110, 110). And finally to ensure the line is drawn, we call the stroke function. Notice that we created another line from the point where the previous line ended. If we wanted to draw a line from a different point we would have needed to call another moveTo function.

Sample:

Your browser does not support the HTML5 canvas tag.
Sample code:

<canvas id="CanvasStroke" width="200" height="150">
Your browser does not support the HTML5 canvas tag.
</canvas>

<script>
    var canvas = document.getElementById('CanvasStroke');
    var ctx = canvas.getContext('2d');
    
    ctx.lineWidth = 1;
    ctx.strokeStyle = 'black';
    ctx.beginPath();
    ctx.moveTo(10, 10);
    ctx.lineTo(110, 110);
    ctx.stroke();
    ctx.lineTo(200, 110);
    ctx.stroke();
    
</script>

Rendering Text

We can draw texts on canvas using fillText and strokeText functions. The arguments are:
text x-coord y-coord
Before calling these functions, we can also specify properties by assigning values to the font property of our context. The order in which these properties are assigned is:
font-style font-weight font-size font-face
The following code illustrates the complete method:


  ctx.strokeStyle = 'black';
  ctx.fillStyle = 'black';
  ctx.font = "normal normal 24px Tahoma";
  ctx.fillText("Hello world", 10, 140);
 
Sample:
Your browser does not support the HTML5 canvas tag.
Sample code:

<canvas id="CanvasText" width="200" height="100">
Your browser does not support the HTML5 canvas tag.
</canvas>

<script>
    var canvas = document.getElementById('CanvasText');
    var ctx = canvas.getContext('2d');
    
    ctx.strokeStyle = 'black';
    ctx.fillStyle = 'black';
    ctx.font = "normal normal 24px Tahoma";
    ctx.fillText("Hello world", 10, 40);
    
</script>


The canvas of HTML5 has a vast domain. In this article I've tried to point out just some of the basic ideas. From here I'd suggest you search the net for a bit more info. As always w3schools has a precise collection of more or less all the features of canvas. Besides this mozilla developer site can also turn out to be really helpful. Although at first canvas might seem a bit intimidating, it is actually quite a great tool to have at hand. Bottom line, this is by far the best light-weight option to create graphic objects on the fly.


Wednesday, March 20, 2013

Javascript disable right click

In some situations some web admins think disabling a right click on their web page is a good idea.

The reason for disabling a right click could be to:

  • protect and hide source code

  • protect images on web page

  • disable copy and paste functionality...

There are opinions that disabling right mouse click is a bad practice and you shouldn't do it on your site (find out why here). It can prevent some novice users from stealing on your site but more advanced users will find a way (to get image or take a look on your source code).

In this article you will find how to:

  • disable right click on whole HTML web page using onmousedown event

  • disable right click on whole page using attribute inside body tag

  • disable right click on some part of HTML page

  • disable right click on image using javascript
No Right click (disabled) with javascript

Disable right click using javascript on HTML page

You can disable right click on your web page using javascript function which will show message box if right mouse button is clicked.

Here is a code:


    <script type="text/javascript">
        function catch_click(e) {
            if (!e) var e = window.event;
            var right_click = (e.which ? (e.which == 3) : (e.button == 2));
            if (right_click) {
                alert('Right clicking on this page is not allowed.');
                return false;
            }
        }
        document.onmousedown = catch_click;
    </script>

Brief explanation of code: When mouse button is clicked javascript function catch_click is called. If right button is clicked message box pop up and right click is canceled.


Disable right click on HTML page using body attribute

This method prevents context menu to appear when right click happened without message box on HTML page. It is very easy to implement.

You just need to add this attribute to body element:

<body oncontextmenu="return false">

Disable right click on only part of HTML page

On the beginning of this article it was said that preventing users from using right click is a bad practice. So if you want to protect something on your page maybe is better practice to protect only this specific element.

It is possible to use oncontext attribute on specific HTML element.

To better explain we will show the example with HTML table with two columns. We will forbid right click only on First column. On Second column right click is possible.

<Table>
   <tr>
    <td oncontextmenu="return false">
     First column (no right click)
   </td>
   <td>
     Second column
   </td>
  </tr>
</Table>

On td tag attribute oncontextmenu is added and set to "return false". So on First column right click is disabled.


No right click Second column

Disable right click on image using javascript

You can disable right click on image using the technique described in previous chapter. Just add oncontextmenu attribute inside img element.

<img src="../PathToImage" oncontextmenu="return false" />

On the beginning of the article you can find image "No right click!" which can not be right clicked.


Wednesday, March 13, 2013

Keep Your Blogging Secure

Blogging is an important outlet for many people. Whether they do it for business, for school, or simply as a way to fill their free time, the number of people who write blogs for one reason or another increases every day, and as the years go by, blogs will only become an even more central part of our culture and how we communicate.

But when writing a blog, it is important to keep your information secure. Surfing the internet is fraught with danger, and the process of publishing a blog only compounds the risks that the internet involves. So for bloggers who are interested in keep their online activity safe, here are a couple tips on how to manage risk and stay secure.

Keep Private Information Private

Remember, the information that goes on a blog is going to be forever public. Even if you delete your blog, there are websites like Google and Archive.com that scrape everything that is published on the internet and store it on their servers permanently. So consider what you want to be public, and what might better be kept private. There are no doubt many young people who are blogging today who will wish they had been more circumspect when the information they publish comes back to haunt them in the future.

But this isn’t only about the future. Being too forthcoming now can expose you to online predators who want to use your information against. The amount of information necessary to commit cyber fraud or identity theft can be surprisingly small. Be careful that you are not disclosing too much on your blog. If you do, strangers who come across that information can use it in all sorts of ways that can wreak havoc on your personal and financial dealings.

Protect Your Site from Viruses

Many people host their own blogs, either on servers they administer or with cloud-hosting companies. In these cases, their blogs can become vectors of online viruses without them even realizing it. They can inadvertently transmit viruses to their servers and websites without intending to. Those viruses are then passed along to their visitors. The best way to avoid this is to conduct all blogging activities over a VPN service , which will stop the transmission of viruses and prevent third-parties from injecting viruses into your online data. This not only protects you, the author of the blog, but it also protects all your readers from all potential harm.

Veronica Clyde is a dedicated writer at VPNServices.net – a website where you can read about VPN services and Online Security. She also loves to share VPN technology, Wordpress and Blogging tips.


Tuesday, March 5, 2013

Group pages for reporting in GA

Ok, using Google Anlytics make a easy to find how many pageviews get your web site or specific web page.

But what if you want to know how many visitors get specific group of pages. For example you want to track only pages written in 2013 or just pages written by specific author or only pages about specific topic...

This article is a guide how to make report for specific group of individually picked pages from your web site.


To better explain how to make reports of specific pages in GA we will explain:

  • How to report only on specifically picked pages

  • How to report pages written in 2012 instantly

  • How to make customized report for year 2012


Track visits from all pages about some topic in GA

Maybe you want to know how many visits coming from some specific topic. For example how many visits drive topics about javacript.

If it is the case you can easily get report in Google Analytics with the number of visits for all pages on your site which include keyword javascript in title. Just follow instructions.

  • In Google Analytics click on Content --> Overview --> Site Content --> All Pages


  • Find and click link "advanced" next to the search bar


  • new container will appear, in third button choose Containing and in empty textbox type desired term. For purpose of this example it is "javascript".


  • click on "Apply" and you will get report for all pages on your site or blog which have term "javascript" in title

Track specifically picked pages on your site instantly in GA

Let's say I want to make a report for group of only two pages on my blog and those two pages are: http://interestingwebs.blogspot.com//2009/01/jscript-in-blogger-post.html and http://interestingwebs.blogspot.com//2009/06/javascript-in-external-file.html.

  • In Google Aalytics click on Content --> Overview --> Site Content --> All Pages


  • Find and click advanced near search bar


  • new container will appear, in third button choose Matching RegExp and in empty textbox type second part of URL of page you want to track. We want to track two pages so we can use or operator : |.

    In our example it would be: "2009/01/jscript-in-blogger-post.html|2009/06/javascript-in-external-file.html".


  • click on "Apply" and you will get report for only two specific pages

Get visits report for all pages written in selected year with Google Analytics

It can be useful to find how many visit drive all pages on your site written in one year. For example I want to know how many visits get my pages written in 2012 for last month.

This can be done with Google Analytics but only if the year in URL of your individual pages. I use blogspot blog and year can be read from URL.

For example:

http://interestingwebs.blogspot.com/2013/02/how-to-make-clickable-picture-in-html.html

From this URL we can conclude article is written in year 2013 and in second (2) month (February).

So, if permalinks on your site are structured in similar way you can use this method to make reports based on year when article is published.

  • In Google Aalytics click on Content --> Overview --> Site Content --> All Pages


  • Find and click advanced near search bar


  • new container will appear, in third button choose Containing and in empty textbox type year in this case 2012.

  • click on "Apply" and you will get report only for two specific pages

Make custom report for posts written in selected year whch can be reused

Now you know how to group pages by specific criteria and make a reports for them. But it have no sense to every time you need such a report you must to create it from scratch. To avoid this you can make custom report which can be used later.

So here is example which will help you to learn some basic steps for creating custom reports. This example learn you how to create and use custom report which will report number of Pageviews for all pages written in 2012 year.

  • Find and click "Customization" in Google Analytics

  • click "New Custom Report"

  • in "General information" enter title, for example "2012 pages"

  • in Report content choose Name, Metric Groups and Dimension Drilldowns. For this example for Name type "2012 pages", for Metric Group choose Pageviews, for Dimension Drilldowns choose Pages.

  • in Filter tab set first button to "Include", second button to "Page"
  • , third button to "Regex" and fourth Textbox to 2012


  • Save custom report and now you can see your Custom Report by clicking Custom Report --> 2012 pages