Tuesday, March 24, 2009

Basic web effect with jQuery

In this article you can find demos and sample code for basic effect functions in jQuery. We have: hide and show effect, fadeIn and fadeOut (disappearing) effect, slide down and slide up effect and animate effect. On my blog you can find more guides for cool javascript effects.

First you need to reference jQuery library (for more information see my first article about using jQuery.

Example:

<script src="http://jqueryjs.googlecode.com/files/jquery-1.3.2.min.js" type="text/javascript"></script>

Hide and show effect

Demo for show and hide function:


Code:
<script src="http://jqueryjs.googlecode.com/files/jquery-1.3.2.min.js" type="text/javascript"></script>
<script type="text/javascript">
$(document).ready(function(){
$('#butShowHide').click(function()
{
$('#pShowHide').toggle();
});
});
</script>
<p id="pShowHide" style="display:none">This paragraph can be shown or hidden</p>
<button id="butShowHide">Show/Hide</button>


When butShowHide is clicked, toggle function is called on paragraph pShowHide.
Toggle function displaying matched elements. If they are shown, toggle makes them hidden. If they are hidden, toggle makes them shown.
There are also show and hide function. Toggle function is easier to use because you don't have to check if element is showed or hidden.


Demo for show and hide function with slow argument:


This div can be shown or hided slow


Code:
<script type="text/javascript">
$(document).ready(function(){
$("#butShowHideSlow").click(function () {

$("#divShowHideSlow").toggle("slow");
});
});
</script>
<button id="butShowHideSlow">Show and hide slowly</button>
<div style="width:300px;height:47px; border: solid 1px black;background-color:LightGrey;text-align:center;" id="divShowHideSlow">This div can be shown or hided slowly</div>


In this case we call toggle function with argument speed (toggle(speed)).
We set speed to slow.
Speed - A string representing one of the three predefined speeds ("slow", "normal", or "fast") or the number of milliseconds to run the animation (e.g. 1000).


FadeIn and FadeOut effect

Demo for fade in and fade out:


This paragraph can fade in and fade out


Code
<script type="text/javascript">
$(document).ready(function(){
$("#butFadeOut").click(function () {
$("#pFadeInOut").fadeOut(3000);
});

$("#butFadeIn").click(function () {
$("#pFadeInOut").fadeIn(3000);
});
});
</script>

<button id="butFadeOut">Fade Out</button>&nbsp;&nbsp;<button id="butFadeIn">Fade In</button>
<br />
<p id="pFadeInOut">This paragraph can fade in and fade out</p>


When button butFadeOut is clicked fadeOut function is called on paragraph pFadeInOut
fadeOut(3000) - fadeOut effect will run for 3 seconds.

When button butFadeIn is clicked fadeIn function is called on paragraph pFadeInOut.
fadeIn(3000) - fadeIn effect will run for 3 seconds.


Slide up and Slide down

Demo for slide up and slide down:


This toggle can be slide up and down


Code:
<script type="text/javascript">
$(document).ready(function(){
$('#butSlide').click(function () {
$('#divSlide').slideToggle("slow");
});
});
</script>

<button id="butSlide">Slide up/down</button>
<br />
<div style="width:300px;height:47px; border: solid 1px black;background-color:LightGrey;text-align:center;" id="divSlide">This toggle can be slide up and down</div>


When button butSlide is clicked slideToggle function is called on div divSlide with argument slow.

slideToggle(speed) - Toggle the visibility of all matched elements by adjusting their height.


Animate effect

Demo for animate:


This paragraph can move left and right


Code:

<script type="text/javascript">
$(document).ready(function(){
$("#butLeft").click(function () {
$("#pMovingParagraph").animate({"left": "-=50px", "opacity": 1}, 500);
});

$("#butRight").click(function () {
$("#pMovingParagraph").animate({"left": " =50px", "opacity": 1}, 500);
});
});
</script>

<button id="butLeft">move left</button>&nbsp;&nbsp;&nbsp;<button id="butRight">move right</button>


When button butLeft is clicked animate function is called on paragraph pMovingParagraph.

When button butRight is clicked animate function is called on paragraph pMovingParagraph.

animate( params, [duration])

params - A set of style attributes that you wish to animate, and to what end.

duration - A string representing one of the three predefined speeds ("slow", "normal", or "fast") or the number of milliseconds to run the animation (e.g. 1000).


Related articles:
jQuery hello world
jQuery on blogspot (blogger) post
jQuery selectors samples

Saturday, March 14, 2009

jQuery on blogspot (blogger) post

You find some cool jQuery features but don't know how to include jQuery code into your blogspot blog? Here you will find two steps needed to jQuery work on your blog.

Two steps for implement jQuery on blogspot post


  1. Reference jQuery library in your blogspot post

  2. To provide jQuery work you must reference jQuery library. One option is to reference on jquery-1.3.2.min.js file on google code.

    <script src="http://jqueryjs.googlecode.com/files/jquery-1.3.2.min.js" type="text/javascript"></script>


    Another option is to upload jquery library file somewhere on the web (look here for advices about uploading files for blogspot) and reference it on blogspot (on blogspot you can upload only images).


  3. jQuery code and style code should be in one line

  4. Example of jQuery code (in this form it will not function on blogger):

    <script type="text/javascript">
    $(function()
    {
    $("#butToggle").click(function()
    {
    $('#dvt').toggle(1000);
    });
    });
    </script>


    This jQuery code (above) should look like this to work on blogspot:

    <script type="text/javascript">$(function(){$("#butToggle").click(function(){$('#dvt').toggle(1000);});});</script>


    Example of style code (in this form it will not function on blogger):

    <style type="text/css">
    #dvt
    {
    width: 200px;
    height: 100px;
    border: solid 1px black;
    background-color:LightGrey;
    text-align:center;
    display:none;
    }
    </style>


    Style code should be like this to work on blogspot:


This demo show jQuery that works on blogger.When you click toggle button div is shown or hidden.

This works on blogger


And here is code needed for this demo that should be in blogspot post:

<script src="http://jqueryjs.googlecode.com/files/jquery-1.3.2.min.js" type="text/javascript"></script>
<script type="text/javascript">$(function(){$("#butToggle").click(function(){$('#dvt').toggle(1000);});});</script>

<style type="text/css">#dvt{width: 200px;height: 100px;border: solid 1px black;background-color:LightGrey;text-align:center; display:none;}</style>

<div id="dvt">This works on blogger</div>
<button id="butToggle">Toggle</button>


Related articles:
Add javascript in blogspot (blogger) post
jQuery hello world
jQuery selectors samples

Tuesday, March 10, 2009

jQuery hello world

This text contain brief tutorial how to use jQuery on your web and have one demo and one short and simple example.

First let's see what is jQuery?
jQuery is a lightweight JavaScript library that emphasizes interaction between JavaScript and HTML. jQuery is designed to change the way that you write Javascript.

To use jQuery you must have access to jQuery library. You can find jQuery library on http://jquery.com/. Choose production and download file.

jQuery download

To use jQuery you need to reference it on your page.

Example:

<script src="jquery-1.3.2.min.js" type="text/javascript"></script>

There is jquery-1.3.2.min.js file but the next version will have different name (probably jquery-1.3.3.min.js) so you will must change name of the file when there will be newer version. This work when you have Jquery library in same directory as your html page.

Another option is to reference jQuery library directly from google code.

Example:

<script src="http://jqueryjs.googlecode.com/files/jquery-1.3.2.min.js" type="text/javascript"></script>

Demo of disappearing paragraph with jQuery:


Example of Jquery, click paragraph
and it will fade away.


Code for disappearing paragraph with jQuery:


<html>
<head>
<script src="jquery-1.3.2.min.js" type="text/javascript"></script>
<script>
(function(){
$("#paragraph1").click(function () {
$("#paragraph1").fadeOut("slow");
});

});
</script>
<style>
#paragraph1 { font-size:150%; cursor:pointer; }
</style>
</head>
<body>
<p id="paragraph1">
Example of Jquery, click paragraph
and it will fade away.
</p>
</body>
</html>


We have reference to jQuery library (see above for explanation)

<script src="jquery-1.3.2.min.js" type="text/javascript"></script>


There is paragraph with id paragraph1

<p id="paragraph1">
Example of Jquery, click paragraph
and it will fade away.
</p>


With this we determine style for element with id paragraph1.
<style>
#paragraph1 { font-size:150%; cursor:pointer; }
</style>


This code says :
when paragraph1 is clicked ( $("#paragraph1").click(function ())
then fadeOut method is called with parameter slow ($("#paragraph1").fadeOut("slow");).

<script>
(function(){
$("#paragraph1").click(function () {
$("#paragraph1").fadeOut("slow");
});
});
</script>


In the end paragraph disappear after user click on it. Instead parameter slow can stand normal or fast. Or time in miliseconds.

Related articles:
jQuery on blogspot (blogger) post
jQuery selectors samples
Basic web effect with jQuery

Wednesday, March 4, 2009

Dynamically change image in js

It is possible to dynamically change image using js (javascript) on web. For example we can display one image when mouse pointer is over image and other image when mouse pointer is no more over image. To find more javascript effects like changing image on this page click on the link.

If you want to change image after user click on image or button then read: alternate image after onclik event.


To do this we will use javascript events (onmouseover and onmouseout) and src attribute.

Demo:

Example of change src atribute of image with javascript

In this demo when you move mouse over image the arrow change side. It is achieved with changing src property. When mouse is over image we see undo.png and when mouse is out of image we see redo.png.

Here is code used for demo:


<script language="javascript" type="text/javascript">

function mouseOverImage()
{
document.getElementById("image").src = "http://www.userinterfaceicons.com/80x80/undo.png";
}

function mouseOutImage()
{
document.getElementById("image").src ="http://www.userinterfaceicons.com/80x80/redo.png";

}
</script>

<img id="image" src="http://www.userinterfaceicons.com/80x80/redo.png" alt="Example of change src atribute of image with javascript" onmouseover="mouseOverImage()" onmouseout="mouseOutImage()">


Computers & Programming > Programming
onmousemove event occurs when the mouse pointer is moved. Each time a user moves the mouse one pixel, a mousemove event occurs.

onmouseout event occurs when the mouse pointer moves away from a specified object.

For demo purposes are used free icons from user interface icons.


For blogger users:
To include js in post see instructions about javascript in blogspot post. Important is that js code should be in one line.

Related articles:
Show and hide html elements

Tuesday, March 3, 2009

RSS reader on your blog or site in three steps

You want to display RSS feed on your blog or web site? You also want to have some control on appearance of this RSS feed on your blog and want to do it fast and keep things simple?
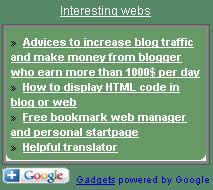
If answer on those question is positive, you should read this article. Final result will look similar to sample on picture.

Sample of RSS reader on blog gmodules gadget for webpage

  1. Go on CustomRSS web page

  2. CustomRSS is one of google gadgets. Highly customizable RSS reader to spice up your page with color and functionality. Tons of options! Capable of showing inline pictures and HTML formatting.

  3. Adjust gadget settings

  4. Most important is to enter FEED URL. In my case this URL was : http://interestingwebs.blogspot.com/feeds/posts/default/-/webs
    Of course, you will enter your feed url.
    You can choose Gadget Title Link, colors, fonts, link actions, number of items...
    Every change you make you see in preview pane.
    For colors you must use hexadecimal color codes. Safe Hexadecimal Color Codes will help you with colors.
    When you are satisfied with your work you can click button "Get Code"

  5. Copy and paste code on your blog or site

  6. Final step is to paste code from CustomRSS web on your site.

    For blogspot bloggers:

    You can paste code in HTML/Javascript gadget. For details see How to add HTML or JavaScript gadget to blog (blogger).

For advanced users:

Advanced user might load more Custom RSS readers in separate div tags. Hide divs and show them with javascript clicks (see article about hiding and showing HTML elements). With this you can see different category lists without reloading page.
Code for advanced users:


<ul style="FONT-SIZE: x-small">
<li><a id="Category1" href="javascript:;" onclick="javascript:hideAllCategories();showCategory('RSS1')">Blog tutorial</a>
<li><a id="Category2" href="javascript:;" onclick="javascript:hideAllCategories();showCategory('RSS2')">Useful webs</a>
</li></li></ul>

<script type="text/JavaScript">
<!--
function showCategory(id)
{
if (document.getElementById(id).style.display == 'none')
{
document.getElementById(id).style.display = '';
}
}
//-->

<!--
function hideCategory(id)
{
document.getElementById(id).style.display = 'none';

}
//-->

<!--
function hideAllCategories()
{
document.getElementById('RSS1').style.display = 'none';
document.getElementById('RSS2').style.display = 'none';
document.getElementById('RSS3').style.display = 'none';
document.getElementById('RSS4').style.display = 'none';

}
//-->
</script>

<div id="RSS1">
<script src="http://www.gmodules.com/ig/ifr?url=http://customrss.googlepages.com/customrss.xml&amp;up_rssurl=http%3A%2F%2Finterestingwebs.blogspot.com%2Ffeeds%2Fposts%2Fdefault%2F-%2Fblog-tutorial&amp;up_title=CustomRSS&amp;up_titleurl=http%3A%2F%2Finterestingwebs.blogspot.com%2Ffeeds%2Fposts%2Fdefault%2F-%2Fblog-tutorial&amp;up_num_entries=30&amp;up_linkaction=openlink&amp;up_background=669966&amp;up_border=CFC58E&amp;up_round=1&amp;up_fontfamily=Arial&amp;up_fontsize=8pt&amp;up_openfontsize=9pt&amp;up_itempadding=3px&amp;up_bullet=arrows&amp;up_custicon=Overrides%20favicon.ico&amp;up_boxicon=0&amp;up_opacity=20&amp;up_itemlinkcolor=FFFFFF&amp;up_itemlinkweight=Bold&amp;up_itemlinkdecoration=Underline&amp;up_vlinkcolor=000000&amp;up_vlinkweight=Bold&amp;up_vlinkdecoration=Underline&amp;up_showdate=1&amp;up_datecolor=9F9F9F&amp;up_tcolor=1C57A9&amp;up_thighlight=FFF19D&amp;up_desclinkcolor=1B5790&amp;up_color=000000&amp;up_dback=FFFFFF&amp;up_dborder=DFCE6F&amp;up_desclinkweight=Bold&amp;up_desclinkdecoration=Underline&amp;synd=open&amp;w=200&amp;h=250&amp;title=Blog tutorial&amp;border=%23ffffff%7C0px%2C1px solid %23595959%7C0px%2C1px solid %23797979%7C0px%2C2px solid %23898989&amp;output=js"></script>
</div>
<div id="RSS2" style="DISPLAY: none">
<script src="http://www.gmodules.com/ig/ifr?url=http://customrss.googlepages.com/customrss.xml&amp;up_rssurl=http%3A%2F%2Finterestingwebs.blogspot.com%2Ffeeds%2Fposts%2Fdefault%2F-%2Fwebs&amp;up_title=CustomRSS&amp;up_titleurl=http%3A%2F%2Finterestingwebs.blogspot.com%2Ffeeds%2Fposts%2Fdefault%2F-%2Fwebs&amp;up_num_entries=30&amp;up_linkaction=openlink&amp;up_background=669966&amp;up_border=CFC58E&amp;up_round=1&amp;up_fontfamily=Arial&amp;up_fontsize=8pt&amp;up_openfontsize=9pt&amp;up_itempadding=3px&amp;up_bullet=arrows&amp;up_custicon=Overrides%20favicon.ico&amp;up_boxicon=0&amp;up_opacity=20&amp;up_itemlinkcolor=FFFFFF&amp;up_itemlinkweight=Bold&amp;up_itemlinkdecoration=Underline&amp;up_vlinkcolor=000000&amp;up_vlinkweight=Bold&amp;up_vlinkdecoration=Underline&amp;up_showdate=1&amp;up_datecolor=9F9F9F&amp;up_tcolor=1C57A9&amp;up_thighlight=FFF19D&amp;up_desclinkcolor=1B5790&amp;up_color=000000&amp;up_dback=E1E9C3&amp;up_dborder=DFCE6F&amp;up_desclinkweight=Bold&amp;up_desclinkdecoration=None&amp;synd=open&amp;w=200&amp;h=100&amp;title=Interesting webs&amp;border=%23ffffff%7C0px%2C1px solid %23595959%7C0px%2C1px solid %23797979%7C0px%2C2px solid %23898989&amp;output=js"></script>
</div>