Showing posts with label Javascript-HTML. Show all posts

Sunday, February 28, 2021

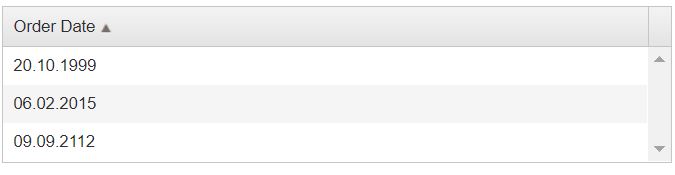
Date sorting in Kendo UI Grid for dd.MM.yyyy format

Date sorting not working as expected in Kedno grid when format does not follow the order YEAR -> MONTH -> DAY.

It is because dates are treated as strings objects and they are compared as plain text.

One solution is to parse strings to dates and sorting will work in an expected manner.

KendoGridSortedDate.js

 1
 2
 3
 4
 5
 6
 7
 8
 9
10
11
12
13
14
15
16
17
18
19
20
21
22
23
24
25
26
27
28
29
30
31
32
var orders = [        
    { OrderDate: '10 20 1999' }, 
    { OrderDate: '2/06/2015' }, 
    { OrderDate: '09/09/2112'}
];

$("#singleSort").kendoGrid({
    dataSource: {
        schema: {
            model: {
                fields: {
                    OrderDate: {
                        type: "date",
                        parse: function (e) {
                            return new Date(e)
                        }
                    }
                }
            }
        },
        data: orders
    },
    sortable: true,

    columns: [
        {
            field: "OrderDate",
            title: "Order Date",
            format: "{0:dd.MM.yyyy}"
        }
    ]
});

KendoGridSortedDate.html

 1
 2
 3
 4
 5
 6
 7
 8
 9
10
11
12
13
14
15
16
17
18
19
20
21
22
23
24
25
26
<!DOCTYPE html>
<html>
  <head>
   
    <style>html { font-size: 12px; font-family: Arial, Helvetica, sans-serif; }</style>
    <title></title>
   
    <link rel="stylesheet" href="http://cdn.kendostatic.com/2015.1.318/styles/kendo.common.min.css" />
    <link rel="stylesheet" href="http://cdn.kendostatic.com/2015.1.318/styles/kendo.default.min.css" />
    <link rel="stylesheet" href="http://cdn.kendostatic.com/2015.1.318/styles/kendo.dataviz.min.css" />
    <link rel="stylesheet" href="http://cdn.kendostatic.com/2015.1.318/styles/kendo.dataviz.default.min.css" />

    <script src="http://cdn.kendostatic.com/2015.1.318/js/jquery.min.js"></script>
    <script src="http://cdn.kendostatic.com/2015.1.318/js/angular.min.js"></script>
    <script src="http://cdn.kendostatic.com/2015.1.318/js/kendo.all.min.js"></script>

  </head>
  <body>
    <div class="demo-section k-header">
      <div id="singleSort"></div>
    </div>

    <script src="KendoGridSortedDate.js"></script>

  </body>
</html>

Source links:

Sorted grid


Saturday, February 27, 2021

Convert a string to a date with javascript method

Change string to date is a frequent action.

Below you can find javascript method which return Date from string.

Function name is stringToDate.

Input parameters are:

  • _date parameter with date in string format
  • _format parameter - use yyyy, dd and MM. Example : yyyy.MM.dd
  • _delimiter - delimiter, for example ".". Can be omitted

 1
 2
 3
 4
 5
 6
 7
 8
 9
10
11
12
13
14
15
16
17
18
19
20
21
22
23
24
25
26
27
28
29
30
31
32
33
34
35
36
<script>

console.log(stringToDate("01/9/2020","dd/MM/yyyy","/")); // Tue Sep 01 2020 00:00:00 GMT+0200 (Central European Summer Time)
console.log(stringToDate("9 2020","MM yyyy"," ")); // Tue Sep 01 2020 00:00:00 GMT+0200 (Central European Summer Time)
console.log(stringToDate("9/17/2020","mm/dd/yyyy","/")); // Thu Sep 17 2020 00:00:00 GMT+0200 (Central European Summer Time)
console.log(stringToDate("9-17-2020","mm-dd-yyyy","-")); // Thu Sep 17 2020 00:00:00 GMT+0200 (Central European Summer Time)
console.log(stringToDate("09/2/2020","mm/dd/yyyy","/")); // Wed Sep 02 2020 00:00:00 GMT+0200 (Central European Summer Time)
console.log(stringToDate("01/9/2020","dd/MM/yyyy")); // Tue Sep 01 2020 00:00:00 GMT+0200 (Central European Summer Time)
console.log(stringToDate("9 2020","MM yyyy")); // Tue Sep 01 2020 00:00:00 GMT+0200 (Central European Summer Time)
console.log(stringToDate("9/17/2020","mm/dd/yyyy")); // Thu Sep 17 2020 00:00:00 GMT+0200 (Central European Summer Time)
console.log(stringToDate("9-17-2020","mm-dd-yyyy")); // Thu Sep 17 2020 00:00:00 GMT+0200 (Central European Summer Time)
console.log(stringToDate("09/2/2020","mm/dd/yyyy")); // Wed Sep 02 2020 00:00:00 GMT+0200 (Central European Summer Time

function stringToDate(_date,_format,_delimiter)
{
            if (!_delimiter)
                _delimiter = _format.match(/\W/g)[0];

            var formatLowerCase=_format.toLowerCase();
            var formatItems=formatLowerCase.split(_delimiter);
            var dateItems=_date.split(_delimiter);
            var monthIndex=formatItems.indexOf("mm");
            var dayIndex=formatItems.indexOf("dd");
            var yearIndex=formatItems.indexOf("yyyy");
            var month=parseInt(dateItems[monthIndex]);
            month-=1;

            var day = 1;
            if (dayIndex >= 0)
                day = dateItems[dayIndex];

            var formatedDate = new Date(dateItems[yearIndex], month, day);
            return formatedDate;
}

</script>

Sunday, February 21, 2021

How to add code snippet in blogger

After a a while I wanted to write new blog post with snippet of SQL code. After googled "add code snippet to blogger" search terms at the of the results a link to the hilite web was found.

It is a very easy to use web. I recommend.

It can be used for various programming languages.

The user only needs to:

  • Type source code
  • Choose Language, Style and Line numbers
  • Click the Higlight button, Preview will appear the and the user only needs to copy and paste HTML code from HTML textbox into blogger post (in HTML view)

Wednesday, March 27, 2013

HTML5 canvas

Canvas is perhaps one of those features of HTML5 which caused a great deal of stir among the web developers. In simple sense, canvas tag allows you to specify a region on your document where you can draw stuff. One thing to be noted is we have to use some sort of a scripting language (usually JavaScript) to interact with canvas. For today's article I'll assume you know the basics of JavaScript.


Creating a Canvas Element

Creating a canvas element is quite simple:


<canvas height = "200" width = "200" id = "canvas1" ></canvas>
It is advised to always give a height and width to canvas element. A id is also necessary as there can be more than one canvas element in a single page.

The above code is actually as far as only HTML will take us, for functionalities of canvas we gotta use JavaScript as mentioned earlier. Please bear in mind any subsequent codes seen in this article must be written inside script tag or an external script file.

Understanding the Context

When we draw something on canvas, we actually retrieve the "context" of the canvas and put stuff on it. Broadly speaking, there are two types of context, 2d (mostly used) and 3d (still experimental). We will use the 2d context. Our first job is to identify our canvas element and create a handler to its 2d context. We do this by the following fragment:


 var canvas = document.getElementById('canvas1');
 var ctx = canvas.getContext('2d');
 
We are first creating a handler to our canvas element (recall it had the id 'canvas1'), then we are retrieving its 2d context through the function getContext().

Basic Canvas Properties

Remember we grabbed the context just on the previous section? Now we are going to set some of its properties. First let's have a look at three basic properties:

  • fillStyle:
    style to use when filling. We can specify CSS colors,gradients or patterns (defaults to black).

  • strokeStyle:
    style to use when filling. Constraints similar to that of fillStyle.

  • lineWidth:
    width of the lines drawn by our imaginary pen on canvas.

Drawing with colors and styles is a two step process. First one is to set the above properties. Other one is to perform the drawing operation i.e. calling the function which performs drawing.

Fill and Stroke

While dealing with canvas you'll find two versions of a function to create rectangles. these are fillRect and strokeRect ("Rect" standing for rectangle). What fill does is it creates the solid shape filled with the designated color/pattern, whereas stroke simply outlines the shape with that color. An example is presented shortly.

Before we append the following fragment to our code, let's have a look at the arguments that the fillRect or strokeRect takes:
x-coord, y-coord, width, height
The coordinates specify the position of upper-left corner of the rectangle, and width and height denotes the size of the rectangle. One reminder, the origin of the coordinate system is situated at the top-left corner of the canvas. Now we can append the following segment:


 ctx.fillStyle = 'tan';
 ctx.fillRect(10, 10, 100, 100);
  
 ctx.lineWidth = 5;
 ctx.strokeStyle = 'red';
 ctx.strokeRect(10 , 10, 100, 100);
 

First we chose the color tan and created a solid rectangle at (10, 10) having height and width of 100. Then we selected the lineWidth to be 5. Next we again selected a color, this time red; and stroked a rectangle at (10, 10) having similar dimensions as the previous rectangle. Notice although we have used colors as the property of fillStyle and such, we could have also used gradients or patterns, which is quite easily possible using CSS3.

Sample:
Your browser does not support the HTML5 canvas tag.

Sample code:
<canvas id="CanvasFill" width="120" height="120">
Your browser does not support the HTML5 canvas tag.
</canvas>

<script>
    var canvas = document.getElementById('CanvasFill');
    var ctx = canvas.getContext('2d');
    
    ctx.fillStyle = 'tan';
    ctx.fillRect(10, 10, 100, 100);

    ctx.lineWidth = 5;
    ctx.strokeStyle = 'red';
    ctx.strokeRect(10, 10, 100, 100);
    
</script>


Drawing Lines

For drawing a line we are going to use four functions: beginPath, moveTo, lineTo and stroke. The function beginPath tells that we are going to create path. We move the imaginary pen to a location through lineTo function. Notice that by "moving the pen" I mean picking the tip of the pen up and then placing it down again at the designated coordinate. The function lineTo instructs to draw a line starting from the current point to th point passed as parameter of lineTo. But the line is actually not drawn unless we call the stroke function. Let's have a look at the following fragment of code:


  ctx.lineWidth = 1;
  ctx.strokeStyle = 'black';
  ctx.beginPath();
  ctx.moveTo(10, 10);
  ctx.lineTo(110, 110);
  ctx.stroke();
  ctx.lineTo(200, 110);
  ctx.stroke();
 

We are setting the line width to be 1 and the color of the stroke to be black. Then we call the beginPath function. We move our imaginary pen to a point, in this case the point (10, 10). In the next line we instruct to create a line from (10, 10) to (110, 110). And finally to ensure the line is drawn, we call the stroke function. Notice that we created another line from the point where the previous line ended. If we wanted to draw a line from a different point we would have needed to call another moveTo function.

Sample:

Your browser does not support the HTML5 canvas tag.
Sample code:

<canvas id="CanvasStroke" width="200" height="150">
Your browser does not support the HTML5 canvas tag.
</canvas>

<script>
    var canvas = document.getElementById('CanvasStroke');
    var ctx = canvas.getContext('2d');
    
    ctx.lineWidth = 1;
    ctx.strokeStyle = 'black';
    ctx.beginPath();
    ctx.moveTo(10, 10);
    ctx.lineTo(110, 110);
    ctx.stroke();
    ctx.lineTo(200, 110);
    ctx.stroke();
    
</script>

Rendering Text

We can draw texts on canvas using fillText and strokeText functions. The arguments are:
text x-coord y-coord
Before calling these functions, we can also specify properties by assigning values to the font property of our context. The order in which these properties are assigned is:
font-style font-weight font-size font-face
The following code illustrates the complete method:


  ctx.strokeStyle = 'black';
  ctx.fillStyle = 'black';
  ctx.font = "normal normal 24px Tahoma";
  ctx.fillText("Hello world", 10, 140);
 
Sample:
Your browser does not support the HTML5 canvas tag.
Sample code:

<canvas id="CanvasText" width="200" height="100">
Your browser does not support the HTML5 canvas tag.
</canvas>

<script>
    var canvas = document.getElementById('CanvasText');
    var ctx = canvas.getContext('2d');
    
    ctx.strokeStyle = 'black';
    ctx.fillStyle = 'black';
    ctx.font = "normal normal 24px Tahoma";
    ctx.fillText("Hello world", 10, 40);
    
</script>


The canvas of HTML5 has a vast domain. In this article I've tried to point out just some of the basic ideas. From here I'd suggest you search the net for a bit more info. As always w3schools has a precise collection of more or less all the features of canvas. Besides this mozilla developer site can also turn out to be really helpful. Although at first canvas might seem a bit intimidating, it is actually quite a great tool to have at hand. Bottom line, this is by far the best light-weight option to create graphic objects on the fly.


Wednesday, March 20, 2013

Javascript disable right click

In some situations some web admins think disabling a right click on their web page is a good idea.

The reason for disabling a right click could be to:

  • protect and hide source code

  • protect images on web page

  • disable copy and paste functionality...

There are opinions that disabling right mouse click is a bad practice and you shouldn't do it on your site (find out why here). It can prevent some novice users from stealing on your site but more advanced users will find a way (to get image or take a look on your source code).

In this article you will find how to:

  • disable right click on whole HTML web page using onmousedown event

  • disable right click on whole page using attribute inside body tag

  • disable right click on some part of HTML page

  • disable right click on image using javascript
No Right click (disabled) with javascript

Disable right click using javascript on HTML page

You can disable right click on your web page using javascript function which will show message box if right mouse button is clicked.

Here is a code:


    <script type="text/javascript">
        function catch_click(e) {
            if (!e) var e = window.event;
            var right_click = (e.which ? (e.which == 3) : (e.button == 2));
            if (right_click) {
                alert('Right clicking on this page is not allowed.');
                return false;
            }
        }
        document.onmousedown = catch_click;
    </script>

Brief explanation of code: When mouse button is clicked javascript function catch_click is called. If right button is clicked message box pop up and right click is canceled.


Disable right click on HTML page using body attribute

This method prevents context menu to appear when right click happened without message box on HTML page. It is very easy to implement.

You just need to add this attribute to body element:

<body oncontextmenu="return false">

Disable right click on only part of HTML page

On the beginning of this article it was said that preventing users from using right click is a bad practice. So if you want to protect something on your page maybe is better practice to protect only this specific element.

It is possible to use oncontext attribute on specific HTML element.

To better explain we will show the example with HTML table with two columns. We will forbid right click only on First column. On Second column right click is possible.

<Table>
   <tr>
    <td oncontextmenu="return false">
     First column (no right click)
   </td>
   <td>
     Second column
   </td>
  </tr>
</Table>

On td tag attribute oncontextmenu is added and set to "return false". So on First column right click is disabled.


No right click Second column

Disable right click on image using javascript

You can disable right click on image using the technique described in previous chapter. Just add oncontextmenu attribute inside img element.

<img src="../PathToImage" oncontextmenu="return false" />

On the beginning of the article you can find image "No right click!" which can not be right clicked.


Wednesday, February 6, 2013

How to make clickable picture in HTML

This short tutorial will learn you how to make a clickable picture in HTML web page.


What is clickable picture?

Clickable picture is picture which will lead you to specific web page when you click on that picture.


To better explain what is clickable picture take a look at image below this text. If you click this image, post "Make clickable links and clickable images" will be opened.

Clickable picture


HTML code for: How to make clickable picture

<a href="URLToLinkedWebPage"><img src="URLImageLocation" /></a>

In HTML code for clickable image you need to replace:

  • URLToLinkedWebPage - with URL to web page you want to be opened when user click on image

  • URLImageLocation - with location of image


Example:

<a href="https://www.google.com"><img src="https://www.google.com/images/srpr/logo3w.png" /></a>

Above HTML code display Google logo ("www.google.com/images/srpr/logo3w.png") and links to "www.google.com" when picture is clicked.


Tuesday, January 29, 2013

Make clickable links and clickable images

How to create clickable links?

Let's first explain what are clickable links.

Clickable link is a text which reference on some web place. So, when clickable link is clicked referenced page is opened. Common term for clickable link is hyperlink.

Example of clickable link:

Some tips for clickable link

When above clickable link is clicked user is redirected to "HTML link code tips" page (http://interestingwebs.blogspot.com/2009/06/tips-for-html-link-code.html).

Guide to make scrollable link on web page

<a href="Web address">Here type clickable text</a>
    We have:

  • the <a> that tag defines a clickable link, which is used to link from one page to another

  • href attribute specifies the web address of the page where link lead

Code for above example of clickable link would be:

<a href="http://interestingwebs.blogspot.com/2009/06/tips-for-html-link-code.html">Some tips for clickable link</a>

To better explain making of clickable links there is one more sample with hyperlink inside sentence.


Example of clickable link in setnence:

This link go to Google.

HTML code for scrollable link inside sentence (above example):

This <a href="https://www.google.com/">link</a> go to Google.

In this example word link is a clickable link while other words in a sentence are not. The word link is enclosed inside <a> and </a> tag.

How to make clickable image in HTML

Clickable image would be an image which will open linked web page when visitor click on this image. It is easy to make such an clickable image.

Sample:

Clickable image sample

When this image is clicked it will lead you to How to make clickable image tutorial!


Thursday, December 6, 2012

3D snowflakes effect on HTML page or blog

Here is a sample of 3D snow effect on HTML page. This sample work with a help of HTML5 and three.js library.

Snowflakes are moving in 3D manner and if you move mouse on left snowflakes will rotate to left. Same thing function for other directions. Try it!.

This 3D snow effect work on new version of browsers which support HTML5 functionality.

It seem this effect does not work on Internet Explorer browser but it works well on Chrome and Firefox.


Here is 3D snowfall code:

<style type="text/css">
   .snow {
    background-color: #000099;
    margin: 0px;
    overflow: hidden;
    width: 650px;
    height: 350px;
   }
</style>
 
<div id="Div1" class="snow"></div>

 <script type="text/javascript" src="http://seb.ly/demos/JSSnow/js/ThreeCanvas.js">
</script>
 <script type="text/javascript" src="https://dl.dropbox.com/u/59215462/SnowFall/3D/Snow.js">
</script>
<script src="https://dl.dropbox.com/u/59215462/SnowFall/3D/3DSnowBox.js"
 type="text/javascript"></script>

<script>
      init('Div1');
  </script>

Let's explain 3D snowfalling code

  • Line 1 to 9 is a style for div HTML element in which snowfall effect is putted, this style is used for .snow class, you can change value in style to adjust width, height or color to your needs

  • Line 11 is div element, its class in snow so style from beginning of code is used on this div

  • Line 13 to 14 is a reference to three.js library, it is 3D library

  • Line 15 to 16 is a reference to Snow.js library. This library make this cool 3D snow effect

  • Line 17 to 18 is a reference to 3DSnowBox.js. This file is mine and it make call to Snow.js easier

  • line 20 to 22 is a javascript call to a Init method with id parameter of div element in which 3D snow should occur

If you find this article useful please make a link to this article on your page or blog!


Monday, November 12, 2012

Christmas effects on HTML page

On this page you can find links to christmas javascript effects which can be applied on your web page.

We will start with two snow effect, then continue with moving santa.

Look below for links to christmas effect tutorials!


Christmas snowing javascript effect - find how to add snowing effect on your web page. Following this link more advanced users can also find how to make snow fall with a custom snow flakes.

Snow fall effect sample from my blog


Moving santa on your HTML page - how to get moving christmas Stana Claus on your HTML page with a help of javascript.

Animate - Moving image effect on web page


3D snow effect in HTML5 - want a window looking on 3D falling snow on your HTML page? This impressive 3D effect you can find by following the link.

3D snow effect with HTML5 and javascript


jQuery snow falling effect - if you like jQuery, linked article could teach you how to add snowing effect on you web site using jQuery.

jQuery snowing effect animation sample

Thursday, November 8, 2012

jQuery snow falling effect on your blog

How to get jQuery snowing effect animation on your blog or web site?

Very easy, you just need to copy a few lines of HTML code plus a few lines of jQuery code and your web page will snowing, many snowflakes will fall.

jQuery snow falling effect is visible on this page. If you look at page you will see falling snowflakes.


To get same (jQuery) snow effect you need to include this code on your page:

<script src="http://code.jquery.com/jquery-1.8.2.min.js" 
type="text/javascript"></script>
<script src="http://cloud.github.com/downloads/kopipejst/jqSnow/jquery.snow.js" 
type="text/javascript"></script>

<script>
 $(document).ready( function(){
         $.fn.snow();
 });
 </script>

So, to get jQuery snowing effect you just need to copy code above and paste it on your HTML page.

First four lines of HTML code are links to jquery-1.8.2.min.js and to jquery.snow.js files. Lines 6 to 10 is jquery code which call snow method from jquery.snow.js file.

jQuery snowing effect animation sample

You can download jquery.snow.js file from WORKSHOP owned by Ivan Lazarevic (the author of snowing script code), then upload this file somewhere on internet and use it for your blog or web site.

There is another snowing effect on my blog written in ordinary javascript.


Wednesday, October 31, 2012

Center a HTML element

How to center div element? This is a question that ask many HTML beginners.

And this is not only question about centering. Frequently people do not know how to center text or button inside div element or button , how to center image inside div element, how to center div block on the screen and many other variations...

In this article we will try to give simple instructions with samples how to make some most common HTML centering.


Center a text inside div:


This text is centered inside div

Code for centering text inside div

<div align=center>This text is centered inside div</div>

So, to div element is added align attribute with value center and we get centered text inside div element.


Center HTML button element inside div element:


Code for centering button element in div

<div align=center><input id="Button1" type="button" value="Centered button" />
</div>

Button HTML element is centered inside div element similar like in previous example. Align is set to center.


Center an image inside div element


Code for centering image in div element:

<div align=center> 
 <img alt="" src="http://www.userinterfaceicons.com/80x80/redo.png" 
            style="height: 85px; width: 198px" id="image" />
</div>

Image is in div element which have align attribute set to center.


Center a div block on screen:

Div block is centered but text is on the left side

Code for centering div block on screen:

<div style="width: 280px; margin-right:auto; margin-left:auto" >
Div block is centered but text is on the left side
</div>

This div is center on the screen but text inside div is not. Div is centered on screen or in some other HTML element by setting margin-right and margin-left attributes to auto.


Center a div block and text inside it

Div block is centered and text is
centered

Code for centered div element with centered text inside it:

<div style="width: 280px; margin-right:auto; margin-left:auto;" align=center >
Div block is centered and text is centered
</div>

This is like previous example. Only difference is that align attribute is set to center.


Monday, October 15, 2012

Div side by side in one line

Find answer how to place two div elements side by side in the same line. When two div elements are placed one after another on HTML page they are displayed in two lines. They usually end up one above the other, never side by side.

Here you can find:

  • how to place two div elements side by side using inline-block

  • example of three div elements side by side using inline-block

  • how to place two div side by side using table


Two div elements side by side using inline-block

This is the first div with text.

This is second div with text

Here is a code:

<div style="width: 100px; height: 100px; 
border: solid 1px #ccc; display: inline-block;">
 <p>This is the first div element.</p>
 </div>

<div style="width: 100px; height: 100px; 
border: solid 1px #ccc; display: inline-block;">
<p>This is second div element.</p>
</div>

To make two div elements in same line display:inline-block is used. An inline block is placed inline (ie. on the same line as adjacent content), but it behaves as a block.

Sometime you want to center a div element, use margin-right:auto and margin-left:auto inside style attribute.

Three div elements side by side using inline-block

This is the first div

This is second div

This is the third div

Code:

<style>
.oneline {
 width: 100px;
 height: 100px;
 border: solid 1px #ccc;
 display: inline-block;
}
</style>

<div class="oneline">
<p>This is the first div</p>
</div>

<div class="oneline">
<p>This is second div</p>
</div>

<div class="oneline">
<p>This is third div</p>
</div>

  • in lines 1 - 9 style for class oneline is defined. "display:inline-block" is used like in previous example.
  • all three divs have class "oneline" so they are in one line.

Two div elements in one line using float left

This is the first div

This is second div

This is third div

This is in new line

Code:

<style> 
    .floatoneline 
    {  width: 100px;  
       height: 100px;  
       border: solid 1px #ccc; 
       float: left;  
    } 
    .pageHolder
    { 
    overflow: auto; 
    width: 100%; 
    } 

</style>   
    <div class="pageHolder">
    <div class="floatoneline"> <p>This is the first div</p> </div>  
    <div class="floatoneline"> <p>This is second div</p> </div>  
    <div class="floatoneline"> <p>This is third div</p> </div>
    </div>
    <span>This is in new line</span>

Using float:left is best way to place multiple div elements in one line. Why? Because inline-block does have some problem when is viewed in IE 9.

Class pageHolder is used to clear floats. It is like <br /> but for folats.

Two div elements side by side in one line using table

First div
Second div

Code:

<table border="1">
<td>
    <div>First div</div>
</td>
<td>
    <div>Second div</div>
</td>
</table>

Above is a simple example how to place two divs together in one line using table. Just make a table and in one row place two columns with divs inside.


Wednesday, September 19, 2012

Change image onclick with jQuery

Learn how to change image when onclick event occurs (with help of jQuery). My previous article was about how to change image with onclick event with common javascript. This article is focused on doing the same thing but with jQuery.

First there will be one simple demonstration of changing image with onclick event with two buttons. Each button change image when clicked.

Second demonstration is how to change image when onclick event is happened on that image. So, image is changed every time user click on it.

Changing image after onclick event on button with jQuery

changing image when onclick event occurs


When "Show Undo" button is clicked arrow is pointed to left, when "Show Redo" is clicked image is changed to arrow pointed to left.

Let's take a look at code:


<p><img alt="" src="http://www.userinterfaceicons.com/80x80/redo.png" style="height: 85px; width: 198px" id="ChangeImage" />
</p>
     
<p><input id="Undo" type="button" value="Show undo" />&nbsp;&nbsp; <input id="Redo" type="button" value="Show Redo"  />
</p>


    <script src="http://jqueryjs.googlecode.com/files/jquery-1.3.2.min.js" type="text/javascript"></script>

    <script type="text/javascript">
        $(document).ready(function () {
            $("#Undo").click(function () {
                $('#ChangeImage').attr('src', 'http://www.userinterfaceicons.com/80x80/undo.png');
            });
            $("#Redo").click(function () {
                $('#ChangeImage').attr('src', 'http://www.userinterfaceicons.com/80x80/redo.png');
            });
        });
    </script>

Explanation of code for alternating image:

  • on the top there are HTML code for image and two buttons
    
    <p><img alt="" src="http://www.userinterfaceicons.com/80x80/redo.png" style="height: 85px; width: 198px" id="ChangeImage" />
    </p>
         
    <p><input id="Undo" type="button" value="Show undo" />&nbsp;&nbsp; <input id="Redo" type="button" value="Show Redo"  />
    </p>

  • to use jQuery we need to have a call to jQuery library
    
       <script src="http://jqueryjs.googlecode.com/files/jquery-1.3.2.min.js" type="text/javascript"></script>

  • the main part of jQuery code, two onclick events, when input Undo is clicked image with id "ChangeImage" is changed to Undo image.

  • when input Redo is clicked image with id "ChangeImage" is changed to Redo image
    
     <script type="text/javascript">
            $(document).ready(function () {
                $("#Undo").click(function () {
                    $('#ChangeImage').attr('src', 'http://www.userinterfaceicons.com/80x80/undo.png');
                });
                $("#Redo").click(function () {
                    $('#ChangeImage').attr('src', 'http://www.userinterfaceicons.com/80x80/redo.png');
                });
            });
        </script>
    

Alternate image when image is clicked with jQuery

When image below is clicked, image is changed.

Check code how to accomplish change image when onclick event is raised:


  <img src="http://www.userinterfaceicons.com/80x80/undo.png" class="img-swap" />

 <script src="http://jqueryjs.googlecode.com/files/jquery-1.3.2.min.js" type="text/javascript"></script>
    <script>
        $(function () {
            $(".img-swap").live("click", function () {
                if ($(this).attr("class") == "img-swap") {
                    this.src = this.src.replace("undo", "redo");
                } else {
                    this.src = this.src.replace("redo", "undo");
                }
                $(this).toggleClass("on");
            });
        });
     </script>

How this code is working?

  • first line is image with class "img-swap"

  • then there is a function which occurs when object with class "img-swap" is clicked

  • if clicked class is "img-swap" then "undo" is replaced with "redo" for src attribute, so the other image is showed

  • if clicked class is not "img-swap" then "redo" is replaced with "undo" for src attribute, so the other image is showed

  • at the end we have - $(this).toggleClass("on") - this code add "on" to class "img-swap" so we get class "img-swap on", on the second click with - $(this).toggleClass("on") - we get only "img-swap"

Tuesday, September 4, 2012

Change image onclick with javascript

How to change image with onclick javascript event on your web page? Easy, just follow instructions you find here.

The onclick event occurs when the user clicks on some element on web page, most when button is clicked. So if you visited this article you probably want some image appear after some button is clicked (then onclick event occurs).

There are two demonstrations and explanations:

  • change image when button is clicked

  • change image when image is clicked

If you like jQuery visit: Alternate image on click with jQuery.

Change image when button is clicked

Give a look at demonstration below, when "Show redo" button is clicked onclick event occurs and image is changed to "redo" image. When "Show undo" is clicked image is changed to "undo" image.


Try to click and make sure.

Here is step by step guide how to make onclick change image demonstration.

  • first you need to add one img element and two input elements.
  • <p>
            <img alt="" src="http://www.userinterfaceicons.com/80x80/redo.png" 
                style="height: 85px; width: 198px" id="image" /></p>
        <p>
            <input id="Button1" type="button" value="Show redo" onclick="ShowRedo()" />&nbsp;&nbsp; 
    <input id="Button2" type="button" value="Show undo" onclick="ShowUndo()" /></p>


  • second step is to add javascript code which will be called when one of input elements (buttons) is clicked
    <script language="javascript">
        function ShowRedo() 
    {
            document.getElementById("image").src = "http://www.userinterfaceicons.com/80x80/redo.png";  
        }
    
        function ShowUndo() 
    {
            document.getElementById("image").src = "http://www.userinterfaceicons.com/80x80/undo.png"; 
        }
    </script>


  • so, when Button1 is clicked, onclick event occurs and ShowRedo() method is called. ShowRedo method change image to "Redo" image

  • when Button2 is clicked, onclick event occurs and ShowUndo() method is called. ShowUndo method change image to "Undo" image

  • here is complete code for this demonstration:
    
    <p>
            <img alt="" src="[PATHTOFIRSTIMAGE]" 
                style="height: 85px; width: 198px" id="image" /></p>
        <p>
            <input id="Button1" type="button" value="Show redo" onclick="ShowRedo()" />&nbsp;&nbsp; 
    <input id="Button2" type="button" value="Show undo" onclick="ShowUndo()" /></p>
    
    <script language="javascript">
        function ShowRedo() 
    {
            document.getElementById("image").src = "[PATHTOFIRSTIMAGE]";  
        }
    
        function ShowUndo() 
    {
            document.getElementById("image").src = "[PATHTOSECONDIMAGE]"; 
        }
    </script>
    

Change image when user cick on image

Below is example how to change image when user click on this image. Try to click it and image will change.

It is accomplished with very similar way like demonstration with two buttons and change image. The difference is that onclick event is happening when image is clicked not button.

  • on the start we have image element with onclick event which call changeImage javascript merhod

  • when onclick event of image occurs javascript method changeImage() is called

  • if src attribute of image element is set to first image then second image is displayed

  • if src attribute of image element is set to second image then first image is displayed

  • <p>
            <img alt="" src="http://www.userinterfaceicons.com/80x80/minimize.png" 
                style="height: 85px; width: 198px" id="imgClickAndChange" onclick="changeImage()"  />
    </p>
    
    <script language="javascript">
        function changeImage() {
    
            if (document.getElementById("imgClickAndChange").src == "http://www.userinterfaceicons.com/80x80/minimize.png") 
            {
                document.getElementById("imgClickAndChange").src = "http://www.userinterfaceicons.com/80x80/maximize.png";
            }
            else 
            {
                document.getElementById("imgClickAndChange").src = "http://www.userinterfaceicons.com/80x80/minimize.png";
            }
        }
    </script>

Wednesday, December 21, 2011

Javascript effects tutorial

Few Javascript effects tutorial links can be found on this page. Learn how to hide HTML element on mouseover with javascript, various javascript image effects or how to change text with javascript on some event (like mouse click or mouse over).

    So, here we have:

  • javascript visual effects

  • javascript image effects

  • Other javascript effects

Find links to javascript effect code tips below!


Javascript visual effects


How to add a falling snow effect - learn how to add nice snowing effect on your web page or blog in few simple steps. Following this link more advanced users can also find how to make snow fall with a custom snow flakes.

Snow fall effect sample from my blog


How to show and hide HTML elements using Javascript - learn how to hide some HTML element (like textbox, div, table, table row) on click or mouse hover with javascript. There are over six samples to better explain how to do it.

Sample of hiding HTML div element


Javascript image effects


Dynamically change image with javascript effect - tutorial how to dynamically change image when a mouse pointer is over image (onmouseover and onmouseout).

Or find out how to alternate image onclick with javascript.

Dynamically change image with javascript effect


Jquery image preview effect - learn how to show image preview when user hover mouse pointer over link.

Image preview effect with jQuery


Moving image on my web site effect - tree samples and guide which describe how to make animate effect to move image through web page.

Animate - Moving image effect on web page


jQuery image zoom effect - sample and step by step guide how to make zoom effect on your web page, so zoomed portion of image is showed when user put mouse over normal size image.


Other javascript effects


Changing text with javascript - change text with javacript on some event like click the link.


HTML5 scrolling text effect with javascript - how to make animated scrolling text within HTML5 like Marquee with jQuery. In HTML5 Marquee is obsolete.


Basic web effect with jQuery - in this article you can find demos and sample code for basic effect functions in jQuery. There are: hide and show effect, fadeIn and fadeOut (disappearing) effect, slide down and slide up effect and animate effect.


Thursday, June 2, 2011

Show and hide javascript

If you want to hide or show HTML elements (div for example) on the fly here you will find few links with detailed step by step instructions and demonstrations how to do it with help of javascript.

    List of guides how to hide and show HTML elements with javascript:

  • How to show and hide HTML elements using Javascript
    In this tutorial you will find how to show/hide HTML elements using jscript with two examples. Each example have demonstration, sample code and short explanation how it works. First example use div tag to show and hide text when somebody click on link. In second example table is showed or hided when somebody click on radio button


  • Hide or show div element
    • In this guide is very simple demo and how to:
    • for hiding and showing div element,
    • div element containing other HTML elements which is hided
    • and
    • one javascript function for hiding various div elements


  • Hide table row with javascript
    How to hide or show entire HTML table on the fly and how to hide or show row in HTML table


  • Show or hide multiple divs
    how to make one jscript function which can be called from multiple places on web page and how to hide multiple divs with only one click link


  • javascript: Changing text
    In this guide you will find how to:
    * Changing text with javascript after clicking a link
    * Changing text with only one jscript function called from two links
    * One link changing text to pressed or unpressed
    * Hide or show text in div and changing link text to "Hide" or "Show"


Monday, May 23, 2011

javascript: Changing text

How to dynamically change text on HTML page with jscript? It is relatively easy to do this. Learn how to make web page where you can changing text with one click on link.

In this guide you will find how to:

  • make a simple javascript function to change text after click on the link

  • change text to two different words with click on first or second link with calling one javascript function

  • change text of one link to "pressed" or "unpressed" after clicking that link

  • hide and show text with changing link text to "show" or "hide"

In this samples text inside Div element is changed after click on link. You should know that it is possible to change text in various HTML elements such as buttons, paragraphs, text in drop down lists...

For more useful javascript effect tips follow the link.

Changing text with javascript after clicking a link

In this demo text will be changed after you click "Change text to AAA" link or another link "Change text to BBB". One link change text to first version ("Text changed to AAA") and a second link change text to another version ("Text changed to BBB").

Demo:

Change text to AAA Change text to BBB

This text will be changed

Here is a HTM/jscript code responsible for changing text demo:

<script language="javascript">
    function changeTextToAAA() 
    {
        document.getElementById("divA").innerHTML = 'Text changed to AAA';
    }

    function changeTextToBBB() 
    {
        document.getElementById("divA").innerHTML = 'Text changed to BBB';
    }
</script>

<a href="javascript:changeTextToAAA();">Change text to AAA</a>
<a href="javascript:changeTextToBBB();">Change text to BBB</a>

<div id="divA"><h4>This text will be changed</h4></div>

Explanation of code:

  • Text is in the div element with id=divA

  • when "Change text to AAA" link is clicked javascript function changeTextToAAA() is called

  • In javascript function changeTextToAAA() innerHTML of divA (where text is stored) is changed to text "Text changed to AAA"

  • Each HTML element has an innerHTML property that defines both the HTML code and the text that occurs between that element's opening and closing tag

  • same principle for "Change text to BBB" link, when "Change text to BBB" is clicked it call function changeTextToBBB() which change text (innerHTML of divA to "Text changed to BBB")

Changing text with only one jscript function called from two links


Demo:

Change text to First Change text to Second

This text will be changed

In this demo text is changed to "First" or "Second" after clicking one of the links which call one jscript function with input parameter with text which appear.

Take a look at code:

<script language="javascript">
    function changeText(newText) 
    {
        document.getElementById("divB").innerHTML = newText;
    }
</script>

<a href="javascript:changeText('First');">Change text to First</a>
<a href="javascript:changeText('Second');">Change text to Second</a>

<div id="divB"><h4>This text will be changed</h4></div>

Explanation of code:

  • Text is in the div element with id=divB

  • when "Change text to First" link is clicked javascript function changeText() is called with parameter 'First' - so call to function look like changeText('First')

  • word entered for input parameter is passed to jscript function which change text to this word - in this case this word is First but if jscript function changeText is called like changeText('MyText') then text will be changed to "MyText"

  • In javascript function changeText() innerHTML of divB (where text is stored) is changed to text from input parameter 'First'

  • same thing for "Change text to Second" link, when "Change text to Second" is clicked it call function changeText('Second') and changing text to "Second" (innerHTML of divB to "Second")

One link changing text to pressed or unpressed


Demo:

Unpressed

When page is loaded link text is "Unpressed". Press link and its text is updated to "Pressed". Click link again ant its text is changing to "Unpressed"...

Sample code:

<script language="javascript">
    function changeTextOfLink() 
    {
        var link = document.getElementById("linkClick");

        if (link.innerHTML == "Unpressed") 
        {
            link.innerHTML = 'Pressed';
        }
        else 
        {
            link.innerHTML = 'Unpressed';
        }
    }
</script>

<a href="javascript:changeTextOfLink();" id="linkClick">Unpressed</a>

Explanation of code:


  • Link with id=linkClick have text "Unpressed", its innerHTML value is "Unpressed"

  • when link linkClick is clicked jscript function changeTextOfLink() is called

  • jscript function changeTextOfLink() check the innerHTML property of link id=linkClick, if link innerHTML property have value "Unpressed" it is changed to "Pressed"

  • when link is clicked again (second time) it have innerHTML value set to "Pressed", then jscript function changeTextOfLink() change innerHTML value to "Unpressed"

Hide or show text in div and changing link text to "Hide" or "Show"

Hide

This div will be hidden


In this javascript demonstration div tag with text "This div will be hidden" is hided when use click link with "Hide" text. Link text is changed to "Show". When user click link again, div element with text "This div will be hidden" will be showed and link text is changing to "Hide".

Code:

<script language="javascript">
    function divToHide(divToHideOrShow) {
        var link = document.getElementById("linkId1");
        var div = document.getElementById(divToHideOrShow);

        if (div.style.display == "block") 
       {
            div.style.display = "none";
            link.innerHTML = 'Show'
        }
        else 
       {
            div.style.display = "block";
            link.innerHTML = 'Hide';
        }
    }
</script>

<a href="javascript:divToHide('divShowHide');" id="linkId1">Hide</a>
<div id="divShowHide" style="position:absolute; display: block"><h4>This div will be hidden</h4></div> 

What this code do:


  • Link with id=linkId1 and text "Hide" on click call jscript function divToHide

  • in div element with id=divShowHide is text "This div will be hidden"

  • when link lnikId1 is clicked jscript function divToHide() is called

  • jscript function divToHide check if div element divShowHide is hidden or showed

  • if div element divShowHide is showed (div.style.display == "block") then div divShowHide is hided and text of link linkId1 is changing to "Show"

  • if div element divShowHide is hided then div divShowHide is showed and text of link linkId1 is changing to "Hide"


Wednesday, May 18, 2011

Show or hide multiple divs

In this tutorial you will learn how to hide multiple div elements with only one action (for example click on button). To hide or show HTML elements javascript is used. Usually for hiding and showing HTML elements, HTML elements are placed in one div tag and this div tag is hided or showed with a help of javascript.

Here you can find two demonstrations:

  • how to make one jscript function which can be called from multiple places on web page

  • how to hide multiple divs with only one click link

If you didn't find exactly what you need in this article try How to show or hide with jscript tips or javascript effects tutorials.

One javascript function which can be reused to hide multiple divs elements

Demonstration:

show/hide Div A

Div A


show/hide Div B

Div B

Here is a sample of javascript function divHideShow with one parameter - id of div you want to hide or show. This code hide or show divA with click on link show/hide Div A which call a function divHideShow. For link show/hide Div B same function divHideShow is called to hide divB (but with divB parameter).


<script language="javascript">
    function divHideShow(divToHideOrShow) 
    {
        var div = document.getElementById(divToHideOrShow);

        if (div.style.display == "block") 
        {

            div.style.display = "none";
        }
        else 
        {

            div.style.display = "block";
        }

        
    }         
</script>

    <a href="javascript:divHideShow('divA');">show/hide Div A</a>
    <div id="divA" style="position:absolute; display: block"><h4>Div A</h4></div>
    <br />  
    <a href="javascript:divHideShow('divB');">show/hide Div B</a>
    <div id="divB" style="display: block"><h4>Div B</h4></div>

In this example div elements are in two line. Sometimes you could find useful tutorial how to place div elements in one line side by side.

If you want to change text of link when you click on the link to "Show" or "Hide" check Show and hide with javascript summary.

Hide or show multiple divs with only one click

Demonstration

show/hide Div C and Div D

Div C


Div D


Here is a sample of code which hide two div tags with only one click on link show/hide Div C and Div D.


<script language="javascript">
    function divHideShow(divToHideOrShow) 
    {
        var div = document.getElementById(divToHideOrShow);

        if (div.style.display == "block") 
        {
            div.style.display = "none";
        }
        else 
        {
            div.style.display = "block";
        }
      
    }         
</script>

    <a href="javascript:divHideShow('divC');divHideShow('divD');">show/hide Div C and Div D</a>
    <div id="divC" style="position:absolute; display: block"><h4>Div C</h4></div>
    <br />
    <div id="divD" style="display: block"><h4>Div D</h4></div>

If you need to center div elements set margin-right and margin-left to auto.


Sunday, May 15, 2011

Hide table row with javascript

Learn how to dynamically hide table row with a help of javascript! In this tutorial there are two samples:

  • How to hide or show entire HTML table on the fly

  • How to hide or show row in HTML table

To find more helpful javascript effect tutorials follow the link.

Hide HTML table on the fly with javascript

Demo:

show/hide Table
Simple table Row 1 Column2
Row 2 Column1 Row 2 Column2

With a clik on link "show/hide Table" entire HTML table is hided or showed. When a link is clicked jscript function elementHideShow with parameter simpleTable which is id of table. Then function elementHideShow hide table if table is showed (display property is block) or show table if table is hided (display property of table is none and become block).

Here is a sample code:


<script language="javascript">
    function elementHideShow(elementToHideOrShow) 
    {
        var el = document.getElementById(elementToHideOrShow);
        if (el.style.display == "block") {

            el.style.display = "none";
        }
        else 
        {
            el.style.display = "block";
        }
    }         
</script>

    <a href="javascript:elementHideShow('simpleTable');">show/hide Table</a>
    
    <table style="width:300px; display:block;" id="simpleTable" border="1">
        <tr>
            <td>
                Simple table</td>
            <td>
                Row 1 Column2</td>

        </tr>
        <tr>
            <td>
                Row 2 Column1</td>
            <td>
                Row 2 Column2</td>

        </tr>      
    </table>

Hide table row with javascipt

Demo:

show/hide Row
Simple table Row 1 Column2
Row 2 Column1 Row 2 Column2

In this case only table row is hided when a link "show/hide Row" is clicked. When use click this link a function elementHideShow is called with a parameter Row2Column1. This parameter is id of row in a table so entire row in HTML is hided (or showed if a row is already hided).

Here is a code:


<script language="javascript">
    function elementHideShow(elementToHideOrShow) 
    {
        var el = document.getElementById(elementToHideOrShow);
        if (el.style.display == "block") {

            el.style.display = "none";
        }
        else 
        {
            el.style.display = "block";
        }
    }         
</script>

    <a href="javascript:elementHideShow('Row2Column1');">show/hide Row 2</a>
    
    <table border="1">
        <tr style="width:300px; display:block;">
            <td style="width:50%" >
                Simple table</td>
            <td>
                Row 1 Column2</td>
        </tr>
        <tr id="Row2Column1" style="width:300px; display:block;">
            <td style="width:50%">
                Row 2 Column1</td>
            <td>
                Row 2 Column2</td>
        </tr>      
    </table>