Saturday, January 31, 2009

Can I upload files on blogspot ?

You can only upload image files to blogspot (blogger). For other types of file you must find your own hosting.

There is a limit of 300MB on the images you are uploading to a BlogSpot blog.

Where to host javascript and similar files?

For non image files (for example css, javascript...) you can use one of the following services.

Free hosting services :

OpenDrive - in this moment in my opinion this is a best choice.

OpenDrive have 5Gb free space storage and bandwith of 1Gb per day. You can use OpenDrive service to host javascript files with javascript functions which you can call from your blogspot posts as an external javascript file.

  • First you need to sign in on this service

  • after you are signed in, go to files tab


  • under Files tab is a Upload option with which you can easily upload files from your computer to OpenDrive service

  • after file is uploaded you can see uploaded file inside MyDocuments in OpenDrive

  • when you hover your mouse over uploaded file there is a little arrow in upper right corner, when this arrow is clicked you can choose Links

  • in Links screen you can find:

    • Direct link - this is a link you can choose for include javascript files in blogger post

    • Direct link - link for direct download

OpenDrive bought few small firms who are offer free hosting of files. In the end of 2011 OpenDrive had a serious incident where they lost some of their users files. I believe they learned from this accident and will not repeat same mistake. So, be careful, my advice is to always keep backup files on your local computer or even better at two different cloud providers.


DropBox

DropBox - excellent tool for sharing files and for upload and host files for your web or blog. Basic account is free and give you storage 2Gb of data.

To host files with dropbox you need:

  • download and install DropBox on your computer/li>

  • open DropBox application - it will open Dropbox folder with Windows explorer

  • open Public folder and put a file you want to host in this Public folder

  • right click on file and choose DropBox --> Copy public link


  • now you have a link in clipboard which you can embedded in your site, just paste it

  • if you don't want your visitors open a shared file but to download it add ?dl=1 to end of link
    For example:
    http://files.dropbox.com/u/12345678/MyFile.pdf
    becomes
    http://files.dropbox.com/u/12345678/MyFile.pdf?dl=1


Google groups

Unfortunately, Google groups no longer support upload of files. They remove the ability to upload new files to groups since 2011.

Create your own Google Group and upload files (100 MB).

  • First go on Google Group and sign in

  • Create group (clik on Create group as in picture below)

  • Create google group

  • Name your group, write a group description and choose access level and click button "Create my group"


  • Now you can upload files

  • Upload files to google group

  • Click browse and choose file to upload from your computer


  • When you uploaded file, you can click on uploaded file in the list and in the address bar you will see url of hosted file

  • Address of hosted file

  • Now you can use this url in your code, for example:


    <link href='http://intblogsupport.googlegroups.com/web/SyntaxHighlighter.css?hl=en&gsc=LopFqhYAAAAyJt7F9v8L6AePkQCcpD2ug-kXU5InE09W2o0GCSVgCQ' rel='stylesheet' type='text/css'/>

  • if javascript file was uploaded and you want to use uploaded javascript use this code:
    <script src="http://everything-about-blogging.googlegroups.com/web/TestJs.js?hl=en&gda=bUe-djsAAAATLYFRxG7MFqGWBWh2VvtrqIEbF7jzfKsOTBbDD3S6g8oRXZrtFiBTuJ69H91AzQAGRdr3QrylPkw2aRbXD_gF&gsc=CJY8-AsAAABni9lzDVHuoDw_bqXODZJz" type="text/javascript"></script>


SkyDrive

Skydrive is online service which offers 25 GB of free online storage.
For hosting files and use them from your blog you must use little hack.
Unfortunately, this is working only 24 hours. After 24 hours URL (address) is changed.

  • You must have Windows Live ID to use skydrive, if you don't have, you can register


  • First upload file in public folder


  • Go to public folder on skydrive


  • Click on file you want to use in your blog


  • Right click on icon for download file and choose "Open link in new tab"

  • How to know address of file for hosting on skydrive

  • Now you can use address from address bar in new tab but don't forget to exclude "?download" on the end of the address

  • Address of file on skydrive to use from blog

  • Attention, this is working only for 24 hours. After 24 hours URL (address) is changed


Monday, January 19, 2009

Create expandable TOC (table of contents or sitemap) in HTML

How to create expandable table of contents for your blog or web? For table of contents some people use abbreviation TOC and others use term sitemap. In this article you will find HTML examples (with some javascript) and instructions how to implement TOC in HTML.

Let's start. First we will show example of creating TOC with one chapter which have one subtopic.

Simple example (one chapter with one subtopic):

+ HTML/Javascript tips


This example have chapter "HTML/Javascript". When you click on "+" you can see subtopic How to show and hide HTML elements using Javascript.

There is sample of HTML code needed to have this feature:

<a id="plusHTML-Javacript" onclick ="javascript:expandCollapse('HTML-JavacriptExpanded', 'plusHTML-Javacript')" href="javascript:;" >+ </a> HTML/Javascript tips
<div class="mid" id="HTML-JavacriptExpanded" style="DISPLAY: none">&nbsp;<a href="http://interestingwebs.blogspot.com/2009/01/how-to-show-and-hide-html-elements.html" target="_blank"><font size="1">How to show and hide HTML elements using Javascript</a></div>


And javascript code:

<script language="JavaScript">
function expandCollapse(divId, anchorID)
{
if(document.getElementById(divId).style.display == 'none')
{
document.getElementById(divId).style.display='block';
document.getElementById(anchorID).innerHTML='-';
}
else
{
document.getElementById(divId).style.display ='none';
document.getElementById(anchorID).innerHTML='+';
}
}
</script>


If you copy and paste HTML and jscript code above in your HTML editor you will get same result as on this page (expandable "HTML/Javascript" chapter with subtopic).

Warning for blogspot users. Javascript code work inside blospot posts only if it is written in one line. For more information see article Add javascript in blogspot (blogger) post.

If you want to implement your own TOC on your web you can copy and paste HTML code below and replace text in square bracket. Don't forget to add javascript portion of code (just copy and paste javascript code above).


<a id="[ANCHORID]" onclick ="javascript:expandCollapsePost('[DIVID]', '[ANCHORID]')" href="javascript:;" >+
</a> [CHPTEXT]
<div class="mid" id="[DIVID]" style="DISPLAY: none">&nbsp;<a href="[TOPICLINK]" target="_blank"><font size="1">[TOPICTEXT]</a></div>


  • [ANCHORID] - ID of <a> tag in which is a + sign. This is need to convert + sign in - sign or - sign to + (in function expandCollapse)


  • [DIVID] - ID of <div> tag. Inside div is anchor tag with hyperlink to subtopis, for more information about hide and show div tag see How to show and hide HTML elements using Javascript


  • [CHPTEXT] - text of chapter


  • [TOPICLINK] - url for subtopic


  • [TOPICTEXT] - text for subtopic


Two chapters side by side

Example:

+ HTML/Javascript tips

+ Useful webs


Two expandable chapters side by side you can implement with this code (plus javascript code):


<a id="[ANCHORID1]" onclick ="javascript:expandCollapsePost('[DIVID1]', '[ANCHORID1]')" href="javascript:;" >+
</a> [CHPTEXT1]
<div class="mid" id="[DIVID1]" style="DISPLAY: none">&nbsp;<a href="[TOPICLINK1]" target="_blank"><font size="1">[TOPICTEXT1]</a></div>

<a id="[ANCHORID2]" onclick ="javascript:expandCollapsePost('[DIVID2]', '[ANCHORID2]')" href="javascript:;" >+
</a> [CHPTEXT2]
<div class="mid" id="[DIVID2]" style="DISPLAY: none">&nbsp;<a href="[TOPICLINK2]" target="_blank"><font size="1">[TOPICTEXT2]</a>
<br>
<a href="[TOPICLINK3]" target="_blank"><font size="1">[TOPICTEXT3]</a>
<br>
<a href="[TOPICLINK4]" target="_blank"><font size="1">[TOPICTEXT4]</a>

</div>


With this system you can build as many chapters with as many subtopics you want.

Chapter with topic and subtopic


+ Blog tutorial

Code for chapter with subtopic (don't forget javascript code):


<a id="[ANCHORID1]" onclick="javascript:expandCollapsePost('[DIVID1]','[ANCHORID1]')" href="javascript:;" > + </a> [CHPTEXT1]
<div class="mid" id="[DIVID1]" style="DISPLAY: none">
&nbsp;&nbsp;&nbsp;<a id="[ANCHORID2]" onclick="javascript:expandCollapsePost('[DIVID2]','[ANCHORID2]')" href="javascript:;" >+ </a> [SUBTOPICTEXT1]
<div class="mid" id="[DIVID2]" style="DISPLAY: none">&nbsp;&nbsp;&nbsp;&nbsp;&nbsp;&nbsp;&nbsp;
<a href="[TOPICLINK1]" target=_blank>[TOPICTEXT1]</a>
</div>
</div>


Related articles:
Adding categories to blogspot (blogger)
How to create scrollable link list
How to create list of post links grouped by category using RSS (blogspot)


Thursday, January 15, 2009

How to show and hide HTML elements using Javascript

This short article give explain how to show/hide HTML elements using jscript.There are two examples : first example use <div> tag to show and hide text when somebody click on link, second example show and hide table when somebody click on radio button. To find more javascript effects follow the link.

Show or hide text with click on hyperlink


To hide HTML element it should be inside <div>.

<div> tag should have style attribute in which is defined DISPLAY property.
DISPLAY property can have value "none" or "block".

If DISPLAY property value is none - the element will not be displayed.
If DISPLAY property value is block - the element will be displayed.

How it work (click on Show/Hide):
Show/Hide


This example hide or show text "This text was hidden" when hyperlink Show/Hide is clicked.

Related links

Hide or show div element - tutorial how to hide div tag with slightly simpler samples and code examples

Hide table row with javascript - How to dynamically hide or show entire HTML table and how to hide or show only one row in HTML table

Show or hide multiple divs - how to make one jscript function which can be called from multiple places on web page and how to hide multiple divs with only one click action

Demonstration of basic web effects with jQuery - in this article you can find demos and sample code for basic effect (hide, show, fadeIn, fadeOut, slide down, slide up and animate effect) functions in jQuery.


Code for example:

<a onclick ="javascript:ShowHide('HiddenDiv')" href="javascript:;" >Show/Hide</a>

<div class="mid" id="HiddenDiv" style="DISPLAY: none" >
This text was hidden
</div>

<script language="JavaScript">
function ShowHide(divId)
{
if(document.getElementById(divId).style.display == 'none')
{
document.getElementById(divId).style.display='block';
}
else
{
document.getElementById(divId).style.display = 'none';
}
}
</script>

We have hyperlink "Show/Hide" (inside <a> tag) which on click call Javascript function ShowHide.
JavaScript function ShowHide display or hide <div> with id "HiddenDiv".

Show <div> - document.getElementById(divId).style.display='block';

Hide <div> - document.getElementById(divId).style.display = 'none';

Inside <div> can be anything, in our case it is simple text but can be table, another <div> element, image...

If you want that your link text change to "Show" when a HTML element need to be showed and text "Hide" when HTML element need to be hided visit: javascript: Changing text

There is a link for simpler explanation how to Hide or show div element and change div visibility with three more demos.


Show or hide table when somebody click on radio button

In this example we will show first table when user choose radio button A with text "You select A,table tblA is shown". If user choose radio button B second table is displayed (tblB) and if radio button C is clicked third table is displayed.

You can test how it is working below:


Please, select optionABC


Here is code:


<script type="text/JavaScript">

<!--
function show(id)
{
if (document.getElementById(id).style.display == 'none')
{
document.getElementById(id).style.display = '';
}
}
//-->

<!--
function hide(id)
{
document.getElementById(id).style.display = 'none';

}
//-->
</script>


<table cellspacing="1" cols="3" border="0">
<tbody>
<tr valign="top" align="left">
<td width="202"><b>Please, select option</b></td>

<td width="481">A
<input type="radio" name="Option" onfocus="hide('tblB');hide('tblC');show('tblA');">
B
<input type="radio" name="Option" onfocus="hide('tblA');hide('tblC');show('tblB');return true;">
C
<input type="radio" name="Option" onfocus="hide('tblA');hide('tblB');show('tblC');return true;">
</td>
</tr>
</tbody>
</table>
<br>
<table id="tblA" style="DISPLAY: none" cols="1" cellpadding="2">
<tbody>
<tr valign="top" align="left">

<td>
You&nbsp;select A,
table
tblA is shown&nbsp;
</td>
</tr>
</tbody>
</table>
<table id="tblB" style="DISPLAY: none" cols="1" cellpadding="2">
<tbody>
<tr valign="top" align="left">
<td>
You&nbsp;select B, table tblB
is shown&nbsp;
</td>
</tr>
</tbody>
</table>
<table id="tblC" style="DISPLAY: none" cols="1" cellpadding="2">
<tbody>
<tr valign="top" align="left">
<td>
You&nbsp;select C, table tblC
is shown&nbsp;
</td>
</tr>
</tbody>
</table>


Let's take a look at code. JavaScript function show show HTML element.
Javascript function hide hide HTML element.
When user click on first radio button (A) table A is displayed while table B and table C are hided.

Sunday, January 11, 2009

Add javascript in blogspot (blogger) post

Did you ask yourself why in blogspot posts some javascript code works but in some cases don't. In this article you will find answer.

In HTML\Jscript gadgets jscript code work well. But this is not a case in posts.

For example I added this code to my blogspot post and it didn't working.

<a onclick=javascript:showMessage() href="#" >Test</a>
<script language="JavaScript">
function showMessage()
{
alert("Is working in post?");
}
</script>


So this javascript code was inserted in blogspot post (another method is to put javascript code in external file). If you are interested in jQuery inside blogger post check : jQuery on blogspot post.

I couldn't understand why this code doesn't working in blogspot post but in my HTML editor work.

Later I found that this jscript code works well in blogspot post:

<a onclick="alert('This works')" href="#" >Test</a>


Conclusion is that if you put jscript code inside quote code will work. But I was not satisfied with this because I wanted to use jscript function and reuse function code (for example function showMessage() called from multiple places in post). And I didn't find answer how to put jscript function in quote. Find more blogger tips on this blog!


Somewhere I founded tip to make jscript file with jscript code and put this file on the web. After that call jscript function addressing that file.

It shold look something like this:

<script src="http://snow-effect.googlecode.com/files/snow.js" type="text/javascript">

</script>


I think that this method have too many steps and that is too complicated (you must upload you jscript file somewhere on the web and later call this file from your blogspot post).

After rejecting this method, I take look at my blog source (View source):

<script language="JavaScript">
<br />function showMessage()<br />
{<br />alert("Is working in post?");
<br />}
<br /></script>


There is a problem. In new line. Every time you have new line blogger editor add <br /> tag. Because of this <br /> tag web browser can't execute jscript.

So correct solution for my problem should look like this:

<a onclick=javascript:showMessage() href="#" >Test</a>
<script language="JavaScript">function showMessage(){alert("Is working in post?");}</script>


To work well javascript in blogger post should be in one line.


This is example of JavaScript code that works (click on Test to see):
Test

Check more javascript for blogspot samples:


Related articles:
jQuery on blogspot (blogger) post
Problem with HTML table in blogspot post

Monday, January 5, 2009

How to create list of post links grouped by category using RSS (blogspot)

This post presented how to make list of links of your blog posts which are grouped by categories. For example I have category "webs" and want that on the sidebar is list of my posts which are in "webs" category.

The result should look like this:

Useful webs


The difference between link list in this post and link list in How to create scrollable link list post is that in this case links are coming from RSS feed and there is no need for manual updating new links. When you add new post your link list will automatically be updated and this is main advantage.

There are two methods to fill link box. One is by using Feed2Jscript and another is by using Google AJAX Feed API - Code.

I chose Feed2Jscript because it is faster but this service is not guaranteed and it is possible to go away.

Steps for creating list of links grouped by category using RSS


  1. Go to Feed2Jscript


  2. Enter the web address of the RSS Feed

    • Web address of the RSS Feed can be for all posts or for all posts in one category

    • For all posts web address is http://[BLOG NAME].blogspot.com/feeds/posts/default

      • [BLOG NAME] is name of your blog

      • For my blog web address for all posts is http://interestingwebs.blogspot.com/feeds/posts/default


    • For all posts in one category web address is http://[BLOG NAME].blogspot.com/feeds/posts/default/-/[CATEGORY NAME]

      • [CATEGORY NAME] is a label, and all posts having this label will be listed

      • For more details about labels and categories in blogspot look Adding categories to blogspot (blogger)

      • For example in my blog address for category "webs" is http://interestingwebs.blogspot.com/feeds/posts/default/-/webs

      • To lear more about writing url for blogspot feed see article Parameters in Blogspot feed


    • You can type directly in web browser web address of the RSS Feed to check if address is correct

    • RSS Feed


  3. Chose remaining values and click button Generate JavaScript

  4. Feed2JS page, click to enlarge

  5. You will get code which you can copy, or you can copy my code bellow

  6. <div style="overflow:auto;width:96%;height:150px;border:1px solid #ccc;padding:5px">

    <script language="JavaScript" src="http://itde.vccs.edu/rss2js/feed2js.php?src=http%3A%2F%2F[BLOG-NAME].blogspot.com%2Ffeeds%2Fposts%2Fdefault%2F-%2F[CATEGORY]&chan=n&num=0&desc=0&date=n&targ=n" type="text/javascript"></script>

    <noscript>
    <a href="http://itde.vccs.edu/rss2js/feed2js.php?src=http%3A%2F%2F[BLOG-NAME].blogspot.com%2Ffeeds%2Fposts%2Fdefault%2F-%2F[CATEGORY]&chan=n&num=0&desc=0&date=n&targ=n&html=y">View RSS feed</a>
    </noscript>
    </div>


    • If you want to use my code, you should replace [BLOG-NAME] with name of your blog (for my blog [BLOG-NAME] is interestingwebs) and replace [CATEGORY] with your categories (for example in my blog webs and blog-tutorial), more about categories in Adding categories to blogspot (blogger)


    • <div> tag is for scrollbox

      <div style="overflow:auto;width:96%;height:150px;border:1px solid #ccc;padding:5px">

      </div>


  7. Now you need to paste code in HTML/jscript gadget

    • Go to Layout.

    • Click on Add Gadget.

    • Select HTML/JavaScript.

    • Enter a title and paste adjusted HTML code from this article and click on button Save (for detailed instructions see How to add HTML code to blog)


  8. You can to add more category lists in one HTML\jscript gadget if you want


That's it.

For those who wants to use Google AJAX Feed API - Code and in case that Feed2Jscript is turning off there are steps to create list of posts with Google AJAX Feed API:

  1. You need to generate API key at http://code.google.com/intl/hr/apis/ajaxfeeds/signup.html

  2. Use this code:

    <!doctype 1.0 strict//en -//w3c//dtd
    http://www.w3.org/tr/xhtml1/dtd/xhtml1-strict.dtd public html xhtml>


    Google AJAX Feed API - Simple Example
    <script src="http://www.google.com/jsapi?key=[API-KEY]"
    type="text/javascript"></script>
    <script type="text/javascript">

    google.load("feeds", "1");

    function initialize() {
    var feed = new google.feeds.Feed("http://[BLOG NAME].blogspot.com/feeds/posts/default/-/[CATEGORY NAME]
    ");
    feed.setNumEntries(100);
    feed.load(function(result) {
    if (!result.error) {

    var container = document.getElementById("feed");
    var ul = document.createElement("ul");
    for (var i = 0; i < result.feed.entries.length; i ) {
    var entry = result.feed.entries[i];
    var li = document.createElement("li");
    var a = document.createElement("a");
    li.appendChild(a);
    a.href = entry.link;
    a.appendChild(document.createTextNode(entry.title));

    ul.appendChild(li);
    }
    container.appendChild(ul);
    //div.appendChild(container);
    }
    });

    }
    google.setOnLoadCallback(initialize);

    </script>


    <div id="feed"
    style="overflow:auto;width:100%;height:150px;border:1px solid
    #ccc;"></div>

    </!doctype>


  3. Replace [API-KEY] with yours generated API KEY, [BLOG NAME] and [CATEGORY NAME]


Related articles:
Adding categories to blogspot (blogger)
How to create scrollable link list
Create expandable TOC (table of contents or sitemap) in HTML

Sunday, January 4, 2009

How to create scrollable link list

If you want to have list of links on your blog but this list is long (for example hundreds of links) and occupies too much space you should read this article.

It is not nice when list of links is too long because it occupies too much space on your blog or web page. If you want to preserve all of your links and space of your blog you can use scrollable box which contains link list.

Here is example of link list with vertical scrollbar:


To create scrollable list of links like this you should add this code:

<div style="overflow:auto;width:100%;height:150px;border:1px solid #ccc;">

<a href="http://interestingwebs.blogspot.com/2008/12/advices-to-increase-blog-traffic-and.html">Advices to increase blog traffic</a>
<br>
<a href="http://interestingwebs.blogspot.com/2008/12/easy-way-to-put-code-snippets-in-blog.html">How to display HTML code in blog or web</a>
<br>
<a href="http://interestingwebs.blogspot.com/2008/12/how-to-add-falling-snow-effect-to-blog.html">How to add a falling snow effect to blog (blogger or blogspot)</a>
<br>
<a href="http://interestingwebs.blogspot.com/2008/12/improve-blog-experience-with-addthis.html">Improve blog experience with bookmarking and sharing service (AddThis button)</a>
<br>
<a href="http://interestingwebs.blogspot.com/2008/11/adding-categories-to-blogspot-blogger.html">Adding categories to blogspot (blogger)</a>

</div>


Of course in <a> tags you should put yours links. And you can add as many links as you want.
The <div> tag defines a division or a section in an HTML document.
In div element overflow property is set to auto which mean that if the content is clipped, the browser should display a scroll-bar to see the rest of the content.


Instructions for blogspot bloggers to add scrollable link list in sidebar :

  1. Go to Layout.

  2. Click on Add Gadget.

  3. Select HTML/JavaScript.

  4. Enter a title and copy and paste adjusted HTML code from this article and click on button Save (for detailed instructions see How to add HTML code to blog)


Positive effect of link list with vertical scrollbar is smaller consumption of space and possibility to view all articles.

Negative effect is that you need to manually update link list every time you add new post.


Related articles:
Adding categories to blogspot (blogger)
How to create list of post links grouped by category using RSS (blogspot)
Create expandable TOC (table of contents or sitemap) in HTML

Saturday, January 3, 2009

How to add HTML or JavaScript gadget to blog (blogger)

How to add HTML code to blog (blogger or blogspot).

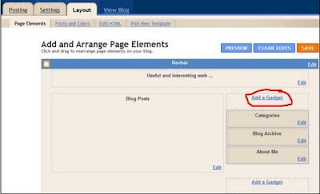
1. Go to Layout.

2. Click on Add Gadget.

Add a page element on blogger

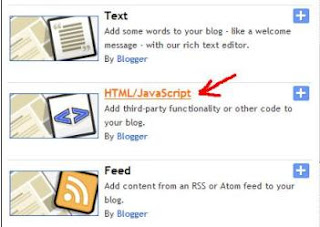
3. Select HTML/JavaScript.

Select HTML or JavaScript on blogger

4. Enter a title and copy and paste HTML or jscript code and click on button Save.