In this blog you can find many good tips about working with blogger templates. My advice is to explore this blog it will be worthwhile.
in reference to: The Blogger Guide (view on Google Sidewiki)Thursday, December 3, 2009
Sunday, November 29, 2009
Download entire website or images
This article can help surfers who want:
- download all pages linked from selected page on their computer
- download entire web site on a local computer
- automatically download all images (and links to images) from specific page or web site
- automatically download any other type of files from selected page or site
or
or
or
Purpose of this article is not to go in details but to give links to applications which can help surfer to move files from web to his local hard. There is no need for saving every file by hand - just enter the starting address, choose what files to save and let the program do the rest of the work.
Extreme picture finder - with this software you can download images, music, video or any other files from websites automatically. Application have "find pictures" feature with built-in web picture search engine. Simply type your search phrase, click "Search" button and you'll have thousands of pictures to choose from in just a few minutes.
Main purpose of Extreme picture finder is downloading images on your computer.
This is a best application for downloading images from web sites I found on Internet. Very intuitive, good designed and user friendly. Unfortunately it is not free, user license plus one year of free updates cost $29.95.
Luckily you can download free evaluation copy for 20 days.
WinHTTrack - this application is FREE.
Main purpose of WinHTTrack is downloading sites on your computer.
In my opinion it is not so user friendly as Extreme picture finder but it is very powerful application. It give user many features.
With this application user can:
- Download web site(s)
- Get individual files - Will only get the desired files you specify (for example, ZIP files), but will not spider through HTML files
- Download all sites in pages
BackStreet Browser - It is a FREE, offline browser. Main purpose is viewing and downloading sites on your computer.
It is less intuitive then Extreme picture finder and less powerful then WinHTTrack. This application was very successfully download my blog so it can be used for backup blogs.
By making multiple simultaneous server requests, BackStreet Browser can quickly download entire website or part of a site including HTML, graphics, Java Applets, sound and other user definable files, and saves all the files in your hard drive, either in their native format, or as a compressed ZIP file and view offline.
Monday, November 23, 2009
Google analytics - exclude your traffic
You can't resist to click and inspect your own blog? Problem is that your actions influence your Google analytic statistics. Your internal traffic have impact on your google analytics reports and this is a reason you can't quality analyze trends on your blog. For example I just put awesome menu bar on my blog and want to see how my Page/Visit is going. But while I implementing and testing menu bar on my blog I clicked many times on it and because my Google analytics reports are not accurate.
In this article you will find:
- how to learn your external IP address
- does you have dynamic or static IP address
- excluding your IP address in google analytics
- exclude your traffic in google analytics with cookies (guide to exclude traffic in GA you can find in second part of article)
The most simplest way to exclude you internal traffic in google analytics is to exclude your IP address with filters. Excluding your IP address in google analytics works if you have fixed IP address.
Those who have dynamic IP address can find how to exclude their own internal traffic with cookies.
Find your external IP address
To learn your IP address go to whatismyip.com and you will see your IP addres on the top of a page.
Does you have static or dynamic IP address
Static IP address is fixed and therefore never changes. Dynamic external IP address can change when you connect to the internet. So you can check your external IP address with help of whatismyip.com, disconnect from Internet, connect to Internet and check again your external IP address with whatismyip.com. If IP addresses are same you have static external IP address, if IP addresses are different you have dynamic external IP address.
Exclude your IP address in google analytics
- In your Google Analytics click Edit
- Click Add filter in the Filters Applied to Profile box
- now enter filter name, under filter type chose traffic from the IP addresses and Save Changes
- on the end all traffic coming from your IP address (if it is static) will be excluded from google analytics reports (after 24 to 48 hours)
Exclude your traffic in google analytics with cookies
More about this topic find in my article Exclude my own visits in GA records with cookies.
Thursday, November 19, 2009
Where are cookies stored on PC
Find where are cookies stored on your computer with IE, Firefox or Chrome internet browser. This article will guide you how to find and inspect cookies with help of your favorite internet browser. You can find instructions to find location of cookies for internet explorer, Mozilla Firefoox and Google Chrome.
Let's first explain what is cookie. Cookie is a message given to a web browser on client PC by a web server. The internet browser stores the message (cookie) in a text file. The message is then sent back to the server each time the browser requests a page from the server. The main purpose of cookies is to identify user.
Locate cookies with IE 8
- In IE8 click Tools --> Internet options
- In General tab click Setting under browsing history
- Final step is to click "View files" button in Temporary Internet Files and History Settings window and directoy with cookies files will be opened.
Find cookies with Firefox
- Click on Tools --> Options
- Click privacy tab, for drop down box choose Use custom settings for history
- Click button "Show Cookies" and Cookies window will be displayed. There is search option, you can view details for specific cookies or remove selected cookie
Find stored cookies with Google Chrome
- Inside Customize and control Google Chrome find and click Options
- Select Under the Hood tab and click Show Cookies button
- In cookies window you can search, inspect and remove cookies on your computer
Realed topics:
Show hidden files and folders on Windows 7
Monday, November 2, 2009
jQuery drop down menu for blogger
How to add horizontal multi level menu to blogger? More precise, how to implement jQuery drop down multi level menu for blogger (blogspot)? You can find step by step guide in this article. Sometimes it can be called blogger menu bar, blogger horizontal navigation menu or horizontal navbar. This article can be useful and for visitors who do not want to install drop down menu on blogger but it is primarily focused on blogger users. In this guide jQuery menu plugin by Joel Birch is used.
First let's explain what jQuery drop down multi level menu mean word by word.
- jQuery - jQuery is designed to change the way that you write JavaScript. It have powerful visual effects and allow our drop down menu to work
- drop down menu - a list of options that appears below the item when the computer user clicks on it or hover mouse pointer over item
- multi level menu - menu from this tutorial is 3 levels depth. Multi level means that you have menus and submenus. For 3 level we have menu items which have submenu items and submenu items can have own submenu items
Example of simple jQuery drop down menu:
Tutorial to add jQuery drop down menu on blogspot
- first step is to add css code to blogger template
- you can find sample css code in the end of article and copy and paste it in Edit Template box
- copy css sample code from the bottom of article
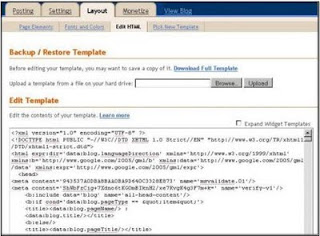
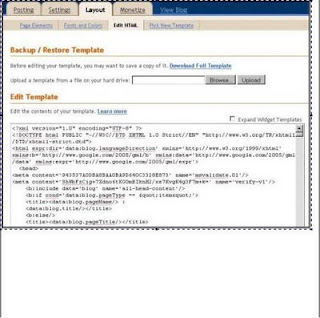
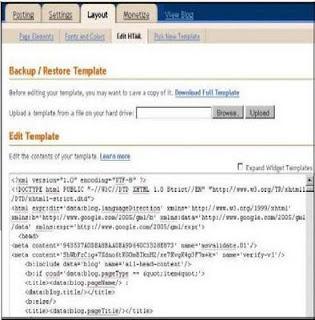
- Go to Layout
- Click on Layout --> Edit HTML
- it is recommended (wise) to backup template on local hard disk before doing any change in edit template box
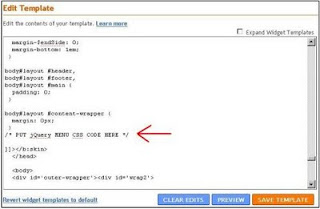
- in Edit HTML box find </b:skin> tag, before this tag paste css code (just before ]]></b:skin>), you can see on picture where to put code, "PUT jQuery MENU CSS CODE HERE"
- you can change css code to adjust your visual preferences of menu if you have enough knowledge, if this is case my suggestion is to use some good HTML editor
- second step is to add HTML/JavaScript page element and add jQuery and HTML code for drop down menu into this page element
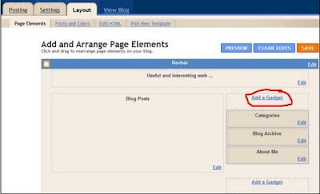
- Go to Layout --> Page elements
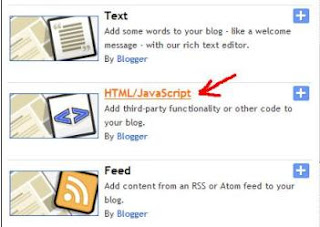
- select HTML/JavaScript
- in Configure HTML/JavaScript window add (copy and paste code below) jQuery code needed for menu to work properly
<script type="text/javascript" src="http://jqueryjs.googlecode.com/files/jquery-1.3.2.min.js"></script>

<script type="text/javascript" src="http://everything-about-blogging.googlegroups.com/web/hoverIntent.js?gda=OCoH4UAAAADAUWBlY8jxn6h_X6rBHvj4fINo3FqnP184lbsvRkkyX55SCaRh6rXo2PdRGn5gs_5txVPdW1gYotyj7-X7wDON"></script>

<script type="text/javascript" src="http://everything-about-blogging.googlegroups.com/web/superfish.js?gda=ap1Fuj4AAADAUWBlY8jxn6h_X6rBHvj4L6oUiMXUy8ihNbuhoIHff41rY0dt7WB7QpdcqEsrVV3jsKXVs-X7bdXZc5buSfmx"></script>

<script type="text/javascript">
   // initialise plugins
   jQuery(function()
   {
     jQuery('ul.sf-menu').superfish();
   });
</script> - in jQuery code above there are three links on external jquery files (jquery-1.3.2.min.js, hoverIntent.js and superfish.js) and jQuery initialize function. You can upload files somewhere you like if you have where to host files, for more information about hosting files for blogger visit the link
- and on the end you must add HTML code for menu items, more information about building menu items in HTML you can find in lower section of this article
<ul class="sf-menu">
    <li class="current">
     <a href="#a">Home</a>
    </li>
    <li>
        <a href="#a">Sample menu 1</a>
        <ul>
            <li class="current">
                <a href="#a">Submenu 1</a>
                <ul>
                    <li>
                         <a href="#a">Sub submenu</a>
                    </li>
                </ul>

            </li>
            <li>
                <a href="#a">Submenu 2</a>
            </li>
        </ul>
    </li>

    <li>
        <a href="#a">Sample menu 2</a>
    </li>
</ul> - click on Save button and you have page element with jQuery menu
- put drop down menu on right position on the blog
- to set HTML/JavaScript gadget with drop down menu below header you should drag and drop HTML/JavaScript gadget right below header gadget like on the picture
- if you want to put multi level menu inside header you can read Add new page element to blogger header
Short guide for building drop down menu in HTML
Intention of this section is to learn users how to build their own jQuery menu with menu items of user's choice. To follow this section requirements are : added jQuery css code in blogger template and links to jQuery scripts in HTML page element under HTML code for building drop down menu.
To start building jQuery menu in blogger we will first add code to show just Home menu item in HTML/Javascript page element:
  <ul class="sf-menu">
    <li class="current">
        <a href="#a">Home</a>
    </li>
  </ul>
Result:
Now we will add menu item "Menu 2" right to Home item, it is new <li> in HTML code
<ul class="sf-menu">
    <li class="current">
        <a href="#a">Home</a>
    </li>
    <li class="current">
       <a href="#a">Menu 2</a>
    </li>
 </ul>
Result:
To add two submenus to "Menu2" item we will open <ul> tag and put two <li> tags, one for each submenu
<ul class="sf-menu">
    <li class="current">
        <a href="#a">Home</a>
    </li>
    <li class="current">
       <a href="#a">Menu 2</a>
       <ul>
        <li><a href="#a">SubMenu1</a></li>
        <li><a href="#a">SubMenu2</a></li>
       </ul>
    </li>
 </ul>
Result:

Last, we will add one 3rd level submenu "Blogger jQuery menu" to Submenu1 which link to this page. To do that one more <ul>, <li> tag are needed
<ul class="sf-menu">
    <li class="current">
        <a href="#a">Home</a>
    </li>
    <li class="current">
       <a href="#a">Menu 2</a>
       <ul>
        <li><a href="#a">SubMenu1</a>
         <ul>
            <li>
                 <a href="http://interestingwebs.blogspot.com/2009/11/jquery-drop-down-menu-for-blogger.html">jQuery menu</a>
            </li>
         </ul>
        </li>
        <li><a href="#a">SubMenu2</a></li>
       </ul>
    </li>
 </ul>
Result:
Sample css code (this code you should Paste inside Edit Template box):
/* jQuery menu in Blogger
----------------------------------------------- */
.sf-menu, .sf-menu * {
 margin:   0;
 padding:  0;
 list-style:  none;
 font-size:  12.5px;
 font-weight: bolder;

}
.sf-menu {
 line-height: 1.0;
}
.sf-menu ul {
 position:  absolute;/*absolute */
 top:   -999em;
 width:   11em; /* left offset of submenus need to match (see below) */
}
.sf-menu ul li {
 width:   100%;
}
.sf-menu li:hover {
 visibility:  inherit; /* fixes IE7 'sticky bug' */
 position:  relative;
}
.sf-menu li {
 float:   left;
 position:  relative;
}
.sf-menu a {
 display:  block;
 position:  relative;
}
.sf-menu li:hover ul,
.sf-menu li.sfHover ul {
 left:   0;
 top:   2.5em; /* match top ul list item height */
 z-index:  99;
}
ul.sf-menu li:hover li ul,
ul.sf-menu li.sfHover li ul {
 top:   -999em;
}
ul.sf-menu li li:hover ul,
ul.sf-menu li li.sfHover ul {
 left:   10em; /* match ul width */
 top:   0;
}
ul.sf-menu li li:hover li ul,
ul.sf-menu li li.sfHover li ul {
 top:   -999em;
}
ul.sf-menu li li li:hover ul,
ul.sf-menu li li li.sfHover ul {
 left:   10em; /* match ul width */
 top:   0;
}

/* jQuery menu Skin */
.sf-menu {
 float:   left;
 margin-bottom: 1em;
}
.sf-menu a {
 border-left: 1px solid #fff;
 border-top:  1px solid #303643;
 padding:   .75em 1em;
 text-decoration:none;
}
.sf-menu a, .sf-menu a:visited  { /* visited pseudo selector so IE6 applies text colour*/
 color:   #13a;
}
.sf-menu li {
 background:  #BEBDC6;
}
.sf-menu li li {
 background:  #ABAAB2;
}
.sf-menu li li li {
 background:  #9D9CA3;
}
.sf-menu li:hover, .sf-menu li.sfHover,
.sf-menu a:focus, .sf-menu a:hover, .sf-menu a:active {
 background:  #C9CED8;
 outline:  0;
}

/* jQuery menu arrows */
.sf-menu a.sf-with-ul {
 padding-right:  2.25em;
 min-width:  1px; /* trigger IE7 hasLayout so spans position accurately */
}
.sf-sub-indicator {
 position:  absolute;
 display:  block;
 right:   .75em;
 top:   1.05em; /* IE6 only */
 width:   10px;
 height:   10px;
 text-indent:  -999em;
 overflow:  hidden;
 background:  url('http://everything-about-blogging.googlegroups.com/web/arrows-ffffff.png?gda=67YBQ0MAAADAUWBlY8jxn6h_X6rBHvj4QNAPmZcqNnLYwV-u6mYlzcxqN3IBlRvSF39T5Jy3ke8ytiJ-HdGYYcPi_09pl8N7FWLveOaWjzbYnpnkpmxcWg') no-repeat -10px -100px; /* 8-bit indexed alpha png. IE6 gets solid image only */
}
a > .sf-sub-indicator {  /* give all except IE6 the correct values */
 top:   .8em;
 background-position: 0 -100px; /* use translucent arrow for modern browsers*/
}
/* jQuery menu - apply hovers to modern browsers */
a:focus > .sf-sub-indicator,
a:hover > .sf-sub-indicator,
a:active > .sf-sub-indicator,
li:hover > a > .sf-sub-indicator,
li.sfHover > a > .sf-sub-indicator {
 background-position: -10px -100px; /* arrow hovers for modern browsers*/
}

/* jQuery menu - point right for anchors in subs */
.sf-menu ul .sf-sub-indicator { background-position:  -10px 0; }
.sf-menu ul a > .sf-sub-indicator { background-position:  0 0; }
/* jQuery menu - apply hovers to modern browsers */
.sf-menu ul a:focus > .sf-sub-indicator,
.sf-menu ul a:hover > .sf-sub-indicator,
.sf-menu ul a:active > .sf-sub-indicator,
.sf-menu ul li:hover > a > .sf-sub-indicator,
.sf-menu ul li.sfHover > a > .sf-sub-indicator {
 background-position: -10px 0; /* arrow hovers for modern browsers*/
}

/*** jQuery menu - shadows for all but IE6 ***/
.sf-shadow ul {
 background: url('http://everything-about-blogging.googlegroups.com/web/shadow.png?gda=4tLiFjwAAADAUWBlY8jxn6h_X6rBHvj4ceGrKIvBGE44_txK-25oJLZEbBiS5QGKHXatl60KKDH9Wm-ajmzVoAFUlE7c_fAt') no-repeat bottom right;
 padding: 0 8px 9px 0;
 -moz-border-radius-bottomleft: 17px;
 -moz-border-radius-topright: 17px;
 -webkit-border-top-right-radius: 17px;
 -webkit-border-bottom-left-radius: 17px;
}
.sf-shadow ul.sf-shadow-off {
 background: transparent;
}
Sunday, October 25, 2009
How to get more backlinks for blog
Backlink is a link from somewhere else to your site. Backlink building is long and boring process but very important. Accidentally, I found interesting free backlink service which can help you to generate many backlinks day by day without lifting a finger.
Guide for blog use who want to join backlink program
To join backlink program blogger should done only three steps:
- go to trafficmomentum web site
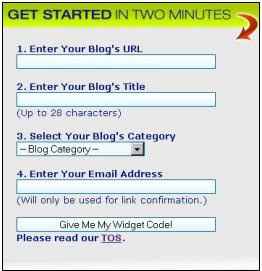
- user should enter his blog info into the form on the right side of page
- user should copy widget code and paste it on appropriate position in his blog
This is how list look on my blog after widget code is implemented:
Widget code is HTML with 7 links. After blog user do all steps, every time some new visitor visit his blog and join trafficmomentum program through click on 7th link "Free Viral Blog Traffic" our blog user will get one more backlink.
How generating backlinks system works
To better explain how backlinks are created we will use sample.
- John have a blog
- John visit blog interestingwebs. On blog interestingwebs is list with 7 links
- blog 1 link
- blog 2 link
- blog 3 link
- blog 4 link
- blog 5 link
- blog 6 link
- advert article link
- trafficmomentum link
- John click on trafficmomentum, enter his blog data and copy & paste widget code to his blog
- now on John's blog is this list
- interesting blog link
- blog 1 link
- blog 2 link
- blog 3 link
- blog 4 link
- blog 5 link
- advert article link
- trafficmomentum link
- interesting blog link is now first because John enter to backlink system from interesting blog trafficmomentum link
- David visit John blog, click on trafficmomentum, enter his blog data and copy & paste widget code to his blog
- now on David's blog is this list
- link to John's blog link
- interesting blog link
- blog 1 link
- blog 2 link
- blog 3 link
- blog 4 link
- advert article link
- trafficmomentum link
- if Peter visit David's blog and enter to backlink system link to John's blog will be at third position...
- let's say only 2 visitors submit to free backlink system on every level, John will have 126 backlinks (2 + 4 + 8 + 16 + 32 + 64), and this is the reason why I like this system, it is simple and effective
One more thing, link to your blog for users who submit to backlink system from your blog will be added after trafficmomentum webmaster approve your submit. trafficmomentum webmaster will send you a mail. In my case it was on the same day.
In the end here is my Free Viral Blog Traffic table:
Friday, October 23, 2009
Add new page element to blogger header
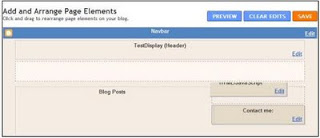
This article give tutorial how to add page element under header in blogspot (blogger). Follow instructions in this article and you should have new page element under (or above) header page element in blogger design (Add and Arrange Page Elements) window. This new page element have exactly same length as header element.
First you can ask yourself, why I want new page element below or above blogger header? Most common answer is that blogger users want menu bar inside header. First step to have menu (or something else) inside blogger header is to add new page element (also called Gadget) under header Page Element which is explained in step by step manner in this short guide. In some cases reason can be to put adverts inside blogspot header.
We will illustrate how Page Element look like before and after new page element is added to blogger header.
Before:
There is only header element (TestDisplay)
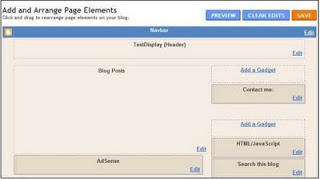
After:
Add Page element window after new gadget is added to blogger header, now it is easy to add new page element beneath or above header element. Take attention to new "Add a Gadget" on the picture.

Steps to add new page element to blogger header
Go to Edit template:
- Go to Layout
- Click on Layout --> Edit HTML
- it is recommended (wise) to backup template on local hard disk before doing any change in edit template box
in Edit Template
- find header-wrapper
<div id='header-wrapper'>
<b:section class='header' id='header' maxwidgets='1' showaddelement='no'> - for maxwidget replace 1 with 3
- if maxwidget is 1 - there is only header and you can't add new gadget in Edit Layout window
- if maxwidget greater then 1 (maxwidget > 1) - you can add new gadget for above or below header in Edit Layout window
- you must replace showaddelement from no to yes
- layout code for header-wrapper should look like this
<div id='header-wrapper'>
 <b:section class='header' id='header' maxwidgets='3' showaddelement='yes'>
Now it is simple to add anything inside a blogger header.
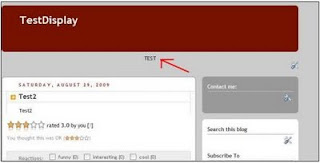
Example of adding text "Test" in the blogger header:
- go to Layout --> Page Elements
- Click Add a gadget above Header page element
- choose text widget
- in content enter TEST and click on Save button
- drag and drop created gadget below header element
- save this and view blog
Of course, last example is just for demonstration purpose, you can add any gadget you want such us: links, HTML menu, AdSense advert...
Friday, October 16, 2009
Change background image in blogger
This article is a simple step by step guide how to change or add background image to your blogger blog. First it will be discussed how to add background image to blogspot header. In second section you can learn few tips and tricks about setting up background image for entire blogger blog. To apply those changes blogger template must be edited.
Change background image in blogger
First step is to go to Edit template:
- Go to Layout
- Click on Layout --> Edit HTML
- it is recommended (wise) to backup template on local hard disk before doing any change in edit template box
To change background header image find #header-wrapper attribute and enter URL of picture you want to be background in header inside url().
Example (tic tac template):
#header-wrapper {
  margin: 0;
  padding: 0;
  font: $pagetitlefont;
  background: #e0e0e0 url(http://www.blogblog.com/tictac_blue/titac.jpg) no-repeat $startSide top;
  }
You can use some image which is already on the web. If image is on your personal computer you can upload it on the web. My advice is to use Google picasa web to upload pictures. After you upload image in Google Picasa, you can chose album, click on picture to open edit mode. Right click on image and click on "Copy Image Location" (in Firefox) and you have URL of image in clipboard. Now you can Paste this URL inside #header-wrapper to background attribute between brackets of url parameter. This is the way to put your image to header background.
Adjust image size
You can encounter problem that your image do not fit (it is too small or too big) to your header background. For background attribute image must fit or it will not be displayed properly. To adjust your image size you can use Windows Paint application (All Programs --> Accessories --> Paint). To adjust image with Paint open image in Paint application and adjust image size. Unfortunately it is possible to loss image resolution with this method.
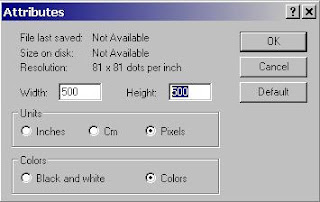
Example of adjusting image from size 488x360 to 500x500 with Paint:
- open image with Paint
- click on Image --> Attributes to open Attributes window
- enter desired width and height (in this example width is 500 and height is 500)
- now your image is expanded with blank space
- You need to select image, click on the corner of selected area and resize to fit to new borders. There must not be empty space anymore
- on the end we have image with specified width and height with some loss of resolution
In case background image is too small to fit in header you can use repeat property. With help of repeat property the background image will be repeated both vertically and horizontally.
Example of code for repeat image in blogger header:
#header-wrapper {
  margin: 0;
  padding: 0;
  font: $pagetitlefont;
  background: #e0e0e0 url(http://static-graphics.jupiterimages.com/stockphotos/572/1wm_tropical_055-thumb.jpg) repeat $startSide top;
  }
Example preview of small image repeat in blogger header:

Simple method to change blogger header background image
There is a simpler method to change blogger header image through blogger interface but it is less flexible then method explained above.
Steps to change blogspot header picture:
- go to Layout --> Page Elements
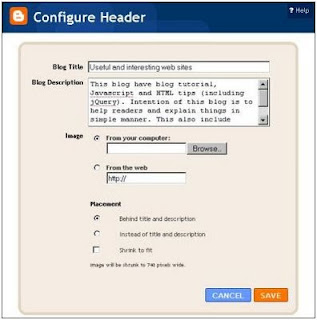
- Click on Edit link for Header (in example Useful and interesting web ... ) in "Add and arrange page elements"
- in Configure Header window chose you image from your computer or from the web
- there is very useful option, Shrink to fit, if you want your picture shrink to fit blogger header check this checkbox
Change or add background image for main area of blogger blog
To learn how to add or change background image for blog and few helpful tips about this topic read this section. To change background image you will have to edit blogger template. It is possible to choose one big image for background or to use repeat property. My advice is to use later. To manipulate background image for blogger content use #outer-wrapper attribute.
Blogger sample without background image
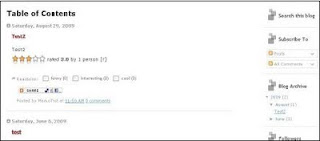
You need to go to Edit Template (for help see beginning of article) and find #outer-wrapper attribute Take attention to background property:
#outer-wrapper {
  width: 1006px;
  margin: 0px auto 0;
  text-align: $startSide;
  font: $bodyfont;
  background: url() no-repeat scroll center center;
  }
Blogger sample with one no repeat background image

- URL to background image is added to background property (inside url)
- no-repeat - instructs the background-image will not be repeated
- center center - position of background image
- scroll - background image scrolls with the rest of the page
#outer-wrapper {
  width: 1006px;
  margin: 0px auto 0;
  text-align: $startSide;
  font: $bodyfont;
  background: url(http://blog.d3r.com/wp-content/uploads/2009/03/d3r-wallpaper-jan09.jpg) no-repeat scroll center center;
  }
Blogger example with vertical repeating image
This is a image for blogger background and it have only 1 Kb. With help of vertically repeat this image can be used for background of blog content window.

On picture you can see two gray columns. Those columns are image above vertically repeated.
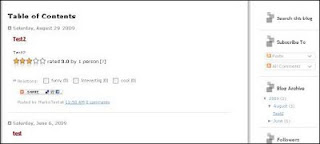
- repeat-y - background image will be repeated only vertically
- 0,0 - position
- with this method you can make your blog look nice without loading some huge image, this is reason why this method is recommended
#outer-wrapper {
  width: 1006px;
  margin: 0px auto 0;
  text-align: $startSide;
  font: $bodyfont;
  background: url(https://blogger.googleusercontent.com/img/b/R29vZ2xl/AVvXsEj6VTFHgw7f65KZdYqxPZX9ogMQuPMo3aRwR6JS7mj_kqGPydArqMZht2pfHmhNmMhqSCjTwiXH-VbIAVS77aqMVo_x8NLhvvUoN0Uz9O-b9TiTCZBxooeerFT65zzNLmW1CrZpqQ2KF_o/s720/tile_left_v2.GIF) repeat-y scroll 0 0;
  }
Thursday, October 8, 2009
Unfollow twitter user who do not follow you back
How to unfollow twitter users who do not follow me back? Why to follow twitter users who not follow you and how to do it? In main twitter application there is no simple way to find users who do not follow you. You can inspect your twitter users one by one but it is time consuming process. And now you ask yourself what is a simplest way to extract twitter users who do not follow you? In this article you will find answer on this question.
You can get list of twitter followers who abandoned you on your email or find it with help of web twitter application and unfollow them.
Manage twitter users who do not follow me back
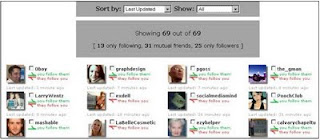
Your Twitter Karma - this excellent web application allows you to manage your followers and users who follow you. You can get list of all followers or all users you follow.
For every twitter user there is:
- user name
- user image
- information does user follow you
- information does you follow user
- last user activity
Thanks to those information, you can make decision what to do with each user individually. You can check twitter users you want to make some action on them and decide what to do with them.
Possible actions are:
- Bulk follow - follow all checked twitter users
- Bulk unfollow - stop follow all checked users
- Bulk block - block all checked users
There is web application friendorfollow with similar functionality but in my opinion Your Twitter Karma is far better choice.
Track twitter users who stop follow you back
NutshellMail - allow you to get mail summary for twitter every day (you can chose how often you would like to receive summary).
In this summary you get:
- New Followers
- New quitters
- Send Tweets
- Direct Messages,Retweets and @Replies
New quitters are twitter users who stop following you. This is the way to actively tracking your twitter account. With NutshellMail you can track and other social services such as facebook and Myspace.
Monday, October 5, 2009
Google search operators and SEO
Do you know you can use Google search operators to gather useful information for Search Engine Optimization (SEO). Google search operators allows you to pull out specific data from google search engine. In this article you can find most useful google search operators with examples and explanations for SEO.
What are google search operators?
Google search operators also called advanced operators are query words that have special meaning to Google. Google search operators allows advanced functionality of Google’s Advanced Search Form in a regular search box query. Some of google search operators are site: inanchor:, inurl:, intext:, intitle: ...
Discover pages on the site indexed by Google
site: operator
site: operator in your query will restrict your search results to the site you specify.
Example:
- site:interestingwebs.blogspot.com
returns all web pages indexed by Google on interestingwebs.blogspot.com
- site:interestingwebs.blogspot.com tips
return all web pages indexed by Google on interestingwebs.blogspot.com with keyword "tips"
SEO usage: with site: operator you can find which web pages on the selected site are indexed by google. Not indexed web pages does not appear in search result page.
Results by anchor text
allinanchor: operator
allinanchor: operator return results containing query terms specified in the anchor text on links to the page. Anchor text is clickable text part of a hyperlink.
Example:
- allinanchor:interesting webs
returns all web pages which have terms "interesting" and "web" in anchor text. Result Selina's Wing Blog have one anchor text "interesting webs" and it is a reason why it is in resutls
SEO usage: number of returned results with allinanchor: operator is used by some SEO experts. Number of returned results with allinanchor: operator can be compared to number of google searches for chosen search terms. To find number of google searches use Google adwords: Keyword tool. Smaller number of returned results with allinanchor:, less competition for chosen keywords and better chance to succeed (but don't forget to include number of google searches in formula).
Search title only
intitle: operator
intitle: operator returns all web pages which have query term in title
Example:
- intitle:SEO
return all web pages with keyword "SEO" inside tag title
- expert intitle:SEO
return all web pages with "SEO" in title and keyword "expert" anywhere in the document
SEO usage: The title tag is a very important part of SEO. With this operator you can estimate the approximate number of competitors for specific keyword.
Search URL
allinurl: operator
allinurl: operator search tells Google to return web pages that have query terms inside URL. The searched term can be in the domain name or in the filename.
Example:
- allinurl:SEO expert
return web pages containig keywords "SEO" and "expert" inside URL
SEO usage:text inside URL are very influential in SEO, so it is imperative to find more information about competition.
Further information and resources:
List of all google operators
8 Google Advanced Search Operators for SEO
Saturday, October 3, 2009
Force google reindex of site
You want to google reindex your web site as soon as possible? In this artcile you can found how google works, how do you know did google indexed your web page, how often does google reindex, how to tell google to (re)index your web page or site.
How google works
Googlebot is a web crawler that finds and crawl web pages. Googlebot sending a request to a web server for a specific web page, downloading the entire page, then handing it off to Google’s indexer. It request many different web pages simultaneously. When Googlebot fetches a web page, it collect all the hyperlinks appearing on the page and adds them to a queue for subsequent crawling. Those hyperlinks are crawled later, and hyperlinks from those pages are collected too. This technique is called deep crawling. Deep crawling allows Googlebot to probe deep within individual web sites.
Googlebot gives the indexer the full text of the web pages it finds. These pages are stored in Google’s index database. When user submit a query to Google Google's index database is used to return best web pages in google's result page.
How to know did Google indexed web page
To check did google (re)index a web page use "site:" search operator:
- site:[URLOfWebPage]
Examples for checking did google re(index) a web site:
- site:interestingwebs.blogspot.com
- this Google query will return all pages on interestingwebs site which are indexed
- in case you can't find some web page in result list, it can be concluded that this page is not indexed
Examples for checking did google re(index) a web page:
- site:http://interestingwebs.blogspot.com/2009/06/tips-for-html-link-code.html
- in case google return result you know web page is indexed
- with this method you know if page is reindex only if title of web page is changed, for example if I changed title to "HTML code tips" and Google return "Tips for HTML code" I can know that web page is not yet reindexed (yet)
How often does google crawl
It depends on the web page. Some pages be crawled every hour, some pages every day and some pages every few weeks or months. Generally if it is consistently adding new content to web site or page have a lot of backlinks (links pointing to web page) google crawler will probably come back more often. Google don't index sites, Google index pages. So on same site one page can be crawled on daily basis while other on can be crawled once in the month. If you submit sitemaps regularly you can most likely speed up the Google crawling for your site.
Force google to reindex site
You can add your url on Google add url page and wait. When your URL is submitted, it is in google queue and google will index your site when it find appropriate. Unfortunately you can't force Google to crawl your site now and index the content.

Saturday, September 26, 2009
What is twittering and best twitter apps
What is twittering?
Twitter is a free social networking and micro-blogging service that enables its users to send (twittering) and read messages known as tweets. Tweets are text-based posts of up to 140 characters in length. Updates (tweets) are displayed on the user's profile page and delivered to other users who have signed up to receive them. Twitter is often described as the "SMS of Internet".
Twittering example
- Twitter user BlogAndSEO tweet message "Just write article about twittering"
- when twitter user BlogAndSEO click on button update message is published (tweeted) and all 20 followers of user BlogAndSEO will see his message (tweet)
- Now, all followers see a new message, more followers more people see this message
Retweet - what it is and how to retweet
The retweet ("RT") allows Twitter users to share the best links, and tweets they find from others.
- 20 people see message of user BlogAndSEO because he have 20 followers, but in case one of the twitter followers retweet this message, let's say user the_gman all of the_gman followers will see BlogAndSEO's message, and hey, the_gman have 92521 followers!!!
- the_gman send this message : "RT @BlogAndSEO: Just write article about twittering"
- Twitter user BlogAndSEO benefit from retweet because the_gman have many followers
Short guide how to retweet
RT @OriginalPoster: RetweetedMessage
Retweet example
RT @BlogAndSEO: Just write article about twittering
How to know you have been retweeted
Go to web address http://www.retweetist.com/users/. Enter the user name and you will get last 30 day retweets for entered twitter user. This is how you can track your retweets.

Manage twitter followers
Twitter followers are twitter users who follow your messages. One of the methods to increase number of twitter followers is to follow other twitter users. Because you follow twitter user there is a chance that he will follow you back, specially if you share common interest with him.
To find and follow twitter users by tag use : wefollow application.
Enter tag and you will get twitter users who have most followers and twittering about chosen tag.
Twubble - can help expand number of people you follow — it searches twitter friend graph and picks out people who you may like to follow
Mycleenr - sort twitter friends by time of their last tweets. It can be used to easily delete inactive users from friend (following) list
Just Tweet It - directories with twitter users, very useful. You can add yourself to one of this directories to get more followers. You can find Twitter Tools Directory also.
Twitter buttons - if you have your own web site or blog you can put a twitter button which link on your twitter account. This is one more way to get more twitter followers. On site Twitter buttons you can find some interesting twitter buttons.
Tweeting links
You want to put hyperlink in tweet. Don't worry, it is enough to write URL and twitter will automatically convert it to linkable short URL.
Example:
Text entered in twitter:
just write new article about making your own strip http://interestingwebs.blogspot.com/2009/09/make-your-own-comic-strip-online.html
Posted twitter message:
just write new article about making your own strip http://bit.ly/17K9F1
For those who want more control with links in tweets I suggest tinyURL web site.
This is useful in case:
- you want to write fully 140 character tweet and don't have enough space, make tiny URL before posting tweet and save space for more text
- you want decide to how you tiny URL text will look like (for example http://tinyurl.com/comicweb for original url http://interestingwebs.blogspot.com/2009/09/make-your-own-comic-strip-online.html)
Twitter hashtags
The twitter hashtag is used to designate topics or categories of information in tweet. A hashtag is a way for others to find information about your keywords even if they are not following you.
Format for hashtag: #WORD
Hashtag example: #blogspot
When you have tweet with hashtag, twitter users can click on hashtag (it is linkable) word and see last tweets which have this hashtag. For example if you click on this #blogspot hashtag you will find last real-time tweet results containing #blogspot hashtag.
Monday, September 7, 2009
Make your own comic strip online
Do you know that you can easily make your own comic on web. And you don't need to be artist. There is a strip generator on web. You can use made characters and just dragging those characters in your strip or make your own characters. You can add bubbles with text inside it (speech balloons), different objects and shapes.
stripgenerator.com is very funny and easy to use. I believe that stripgenerator is one of the best comic generators on web. My rate is excellent. Try and see!
Let's see a comic I maked in 15 minutes:

What can be done with strip generator
- use existing drawings of humans, beings, objects, shapes and bubbles
- easy drag end drop of existing objects to strip
- add speech balloons and enter your text
- change size and rotating existing objects
- add and remove frames
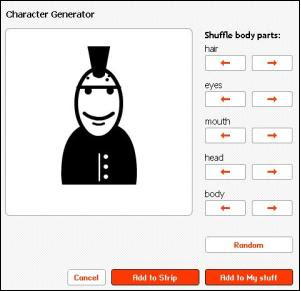
- generate a custom character
- embedding comics in other web pages
- searh strip gallery...
Guide to make your own strip (comic book) online
- go on stripgenerator.com
- click on "Create strip"
- drag & drop objects in frames and make your own comic
- you can use character generator to create your custom made characters
- you can embed strip with copy & paste code in embed text box
On stripgenerator page you can publish your strip blog, leave messages on their forum, search last strip blogs...
Wednesday, September 2, 2009
No tooltip bug in Firefox 3.5
After upgrading firefox to 3.5.2 version I noticed that there is no tooltips. Tooltips are missing and instead of missing tooltip there was small white rectangle cursor box. I found solution for this problem with a help of google.
It is no tooltip bug (or blank tooltip bug) in Firefox 3.5. Solution is to uninstall and reinstall the latest version of Google toolbar for Firefox. To be sure that problem is in Google Toolbar try to start Firefox in safe mode. If Firefox in safe mode properly display tootips then source of problem is in one of the add-ons (probably Google Toolbar for Firefox)
To uninstall Google toolbar for Firefox click Tools-->Add-ons, choose on Google toolbar and click Uninstall

This article refer to no tooltip bug or blank tooltip bug in Firefox 3.5.
Friday, August 28, 2009
Star rating system on your blog
How to install star rating widget to your blog or web site? You will find guide in this article. First we will take a look at free star rating and recommendation system outbrain.com. Outbrain.com is a content ranking and recommendation widget for blogs, RSS, magazines and news. Second, we will show how to implement outbrain star rating on blogger (this widget can be installed on the other blog platforms too). In the third section you can learn about blogger reactions feature and blogger star rating feature which exists only in draft mode.
Star rating widget - outbrain
One option is to use star rating and recommendation widget which you can find on web address www.outbrain.com. Outbrain star rating widget can be easily installed to different blog platforms (Typepad, Blogger, Wordpress, Drupal) and to FeedBurner RSS feed. Star rating system is very straightforward to install on blog. In second section you can find example of installing outbrain rating system on blogger. It can be installed on web sites too, by embeding generic java-script code on your site.
Outbrain star rating widget loook like this:

Outbrain star rating widget is composed of 5 star rating part and recommendations part. In star rating part you can see how many visitors rated page and average rating. In recommendations part there are personalized recommended links selected by outbrain rating system. You can exclude recommendations if you like.
If you are registered to Outbrain rating system service you can track rating of every post in your blog:

Installing Outbrain rating widget on blogger
- Register on www.outbrain.com (you can install rating system without Registering on outbrain site but then you will not have blog reports)
- Sign in to outbrain site and click on "Claim your blog"
- Enter blog URL, chose Yes for Install rating widget, Select your blogger platform and select language
- On Add Page Element click on Add Widget button and your blogspot blog have outbrain rating star widget on every post
Maybe you will need uninstall instructions for outbrain star rating widget for blogger:
- From your Dashboard:
Click Layout >> Edit (on Ratings by Outbrain) >> Remove Page Element - find and remove code :
<b:widget title="Ratings by outbrain" type="HTML">
if ratings still appear in blogger
This code can be found on the layout tab in the "Edit html" section. Remove this code.
Blogger star rating and reactions feature
Blogger have its own five star rating feature. This feature exists only in blogger drat mode. To use blogger draft mode you should login on web address http://draft.blogger.com.

This feature didn't work well on my blog. There was problem with loading, one time it worked and another time did not.
Guide to use blogger star rating feature:
- log in blogger draft mode
- click Layout --> Page Elements in "Blog Posts" click on Edit
- in Configure Blog Posts page check "Show Star Ratings" checkbox
Blogger reactions feature
Blogger also have reaction feature. With this feature visitors can check one of offered reactions and blog owner have feedback.

Instructions for installing blogger reactions widget:
- click Layout --> Page Elements in "Blog Posts" click on Edit
- in Configure Blog Posts page check "Reactions" checkbox (with click on Edit you can enter your preferred blog reactions separated by coma, for example on picture blog reactions are : bad, good, excellent)
- click save and now you have reactions widget on every post
My experience with reactions feature is positive. It works very good without problems, while blogger star rating feature have difficulties and is still in draft mode.


